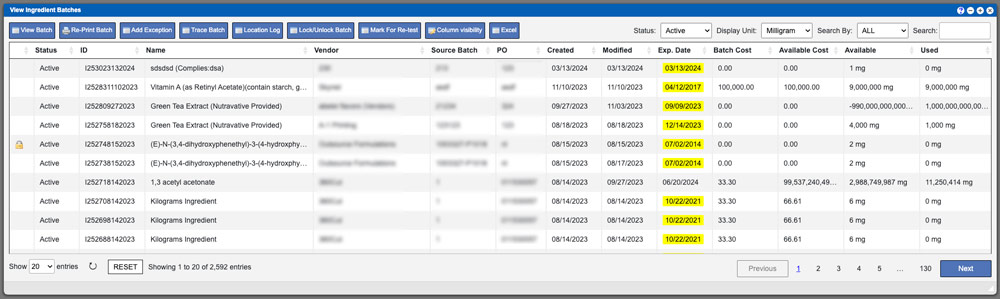
The grid displayed will list all available Batches in the system per the type that you are viewing. These entries can be sorted by clicking the column titles, using the search function or filtering by additional options. A yellow colored expiration date signifies that the batch has expired.
Virtual Ops System Location/Navigation:
Inventory Batches > View Batches > Select available component from dropdown
Quick Links
Adding exception
Location Log
Split Batch
Grid Column Information
Action Buttons
View Batch – This action allows you to view details about the batch and modify the requalification date. For more information on the Requalification System click here (link coming soon).
Reprint Batch – This action will reprint the batch sticker.
Add Exception – This action will allow you to add exceptions to containers within the selected batch. For more information click here
Trace Batch – This action will allow you to view the container changes made to the selected batch. For more information click here
Location Log – This action will display the history of the containers that have been moved.
Lock/Unlock Batch – This action will allow you to lock or unlock a batch. A locked batch cannot be added to a BPR. A batch that is currently added to open BPR cannot be locked.
Mark for Re-test – This action will send the selected batch back to the Quarantine List and set the status to Requalification. From there the batch can be retested from the lab testing section and then rereleased into inventory.
Column Visibility – By selecting this option you can change the visible columns per the grid you are on. These selections are saved per user/browser per grid.
Excel – Selecting this action will export the currently displayed grid data to excel.
View Batch
In order to view the batch trace, you will need the Batch Trace permission. (Page Permissions -> Batches -> Batch Trace)
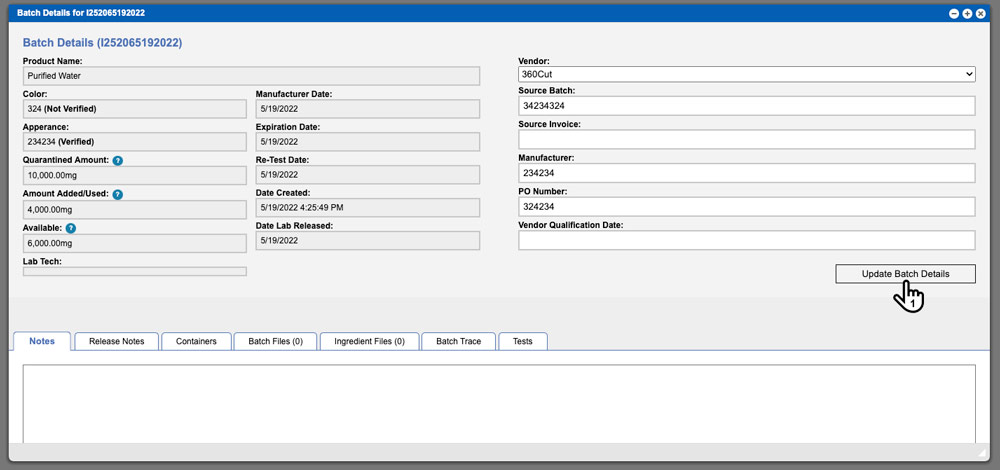
The view batch details window contains several inputs that can be modified. These inputs are located on the right top of the window and are white in color (not grayed out). Once the detail inputs have completed you will need to click the “Update Batch Details” button (1). See example image below.
Please note that if your system has the PO Auto Receive feature turned on and you change the PO number the system will automatically change the PO status of the old and the new PO. The old PO will be put back into the status it was before it was either partially received or received. If a previous status cannot be found, then the PO status will not change. The old PO will then be updated based on the rules below.
- If all the items on the old PO have been received the PO status will be automatically switched to “Received”.
- If some the items on the old PO have been received the PO status will be automatically switched to “Partially Received”.
The newly assigned PO will then be updated based on the following rules.
- If all the items on the new PO have been received the PO status will be automatically switched to “Received”.
- If some the items on the new PO have been received the PO status will be automatically switched to “Partially Received”.
Batch Details Tabs
Notes – This tab will display any notes that have been added during the quarantine process.
Release Notes – This tab will display any notes that have been added during the Quarantine Release process.
Containers – This tab will display all of the containers and their amounts within this batch.
Batch Files – This tab will display any files added during the Quarantine and Quarantine Release process. You can also add additional files via the “Upload File” Button.
Ingredient Files – This tab will display any files that have been added to the ingredient/component.
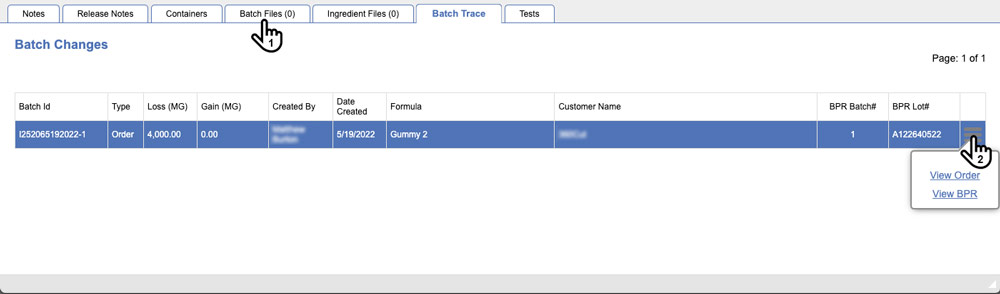
Batch Trace – This tab (1) will display any exceptions made to containers within this batch. If the container was added to a BPR you can view the BPR or the order details. These options can be accessed from the menu icon (2) located at the end of the row. See example image below.
Tests – This tab will list any test types that have been added to this batch.
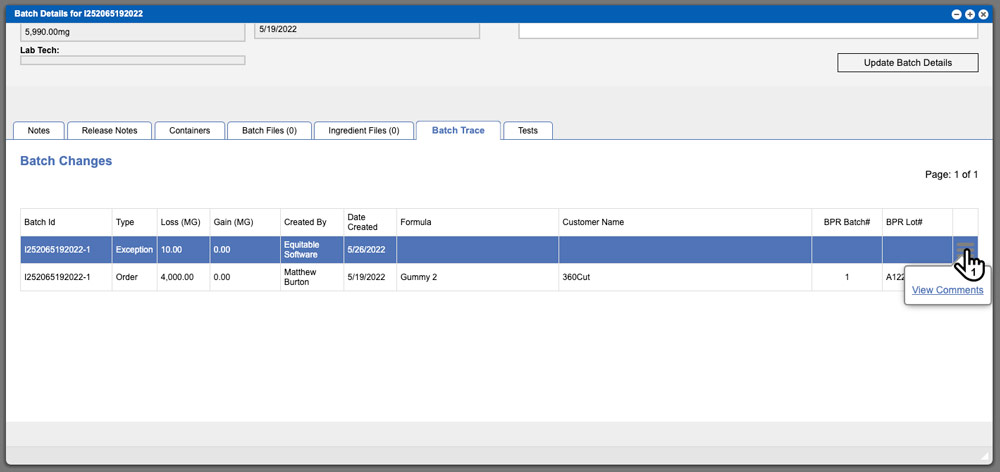
If an exception to a container has been made manually either from Virtual Ops or a Scanner an additional row will be displayed. You can also view the comments made at the time of the exception by hovering over the menu icon (1) located at the end of the row. See example below.
Select a batch and click the Add Exception action button located at the top of the grid window to begin this process. If you are adding inventory to multiple containers start by selecting the Gain option from the “Exception Type” dropdown. Next select the container you want to add inventory to via the “Container” dropdown. You also have the ability to add a container within this dropdown. Once a container has been selected enter the amount in the “Exception Amount” input box and designate your unit. To complete this process click the blue “Add Container” button. See image example below.

To enter a Loss amount to a container select Loss for the Exception Type dropdown. Next select the container you want to remove inventory from. Once a container has been selected enter the amount in the “Exception Amount” input box and designate your unit. Once your exceptions have been created, enter your reasons and click the green “Submit Exception” Button. To complete this process click the blue “Add Container” button. See image example below.
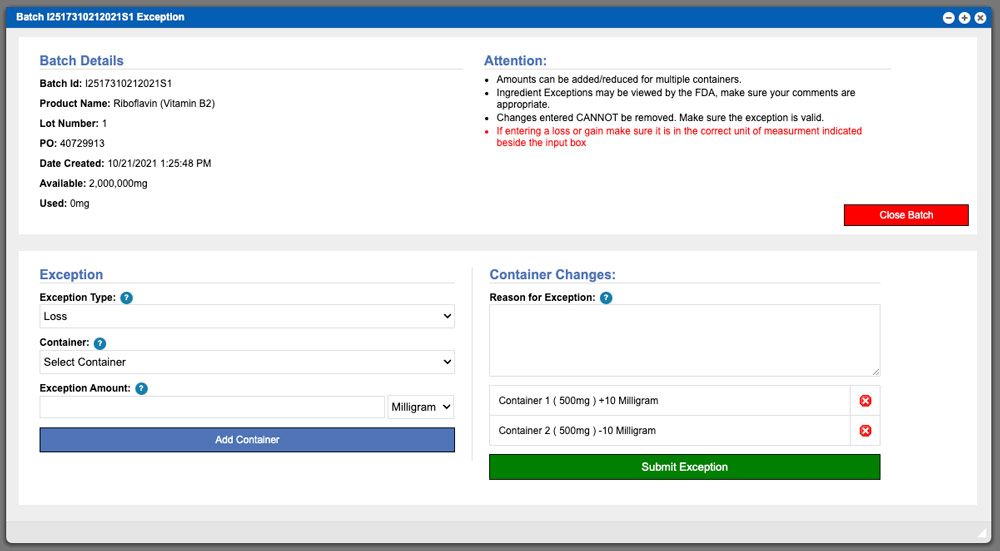
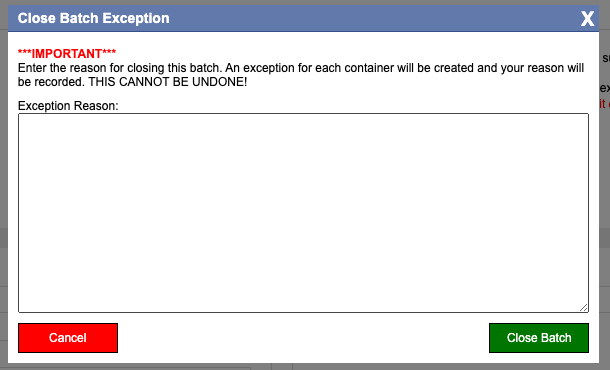
To close a batch, which reduces the containers to zero, click the red “Close Batch” button. To complete this process you will need to enter in an exception reason and then click the green “Close Batch” button. See example image below.
The location log window will show the current locations for all containers within the selected batch. These entries can be sorted by clicking the column titles, using the search function or filtering by additional options. You can move multiple containers to a different location. To start this process select the containers to be moved by clicking the check box (1). Multiple items can be selected at once by clicking the top most box (2). Once you have selected the containers that you want to be moved, select a location from the dropdown at the top of the screen (3) and click the “Update Location” button (5).
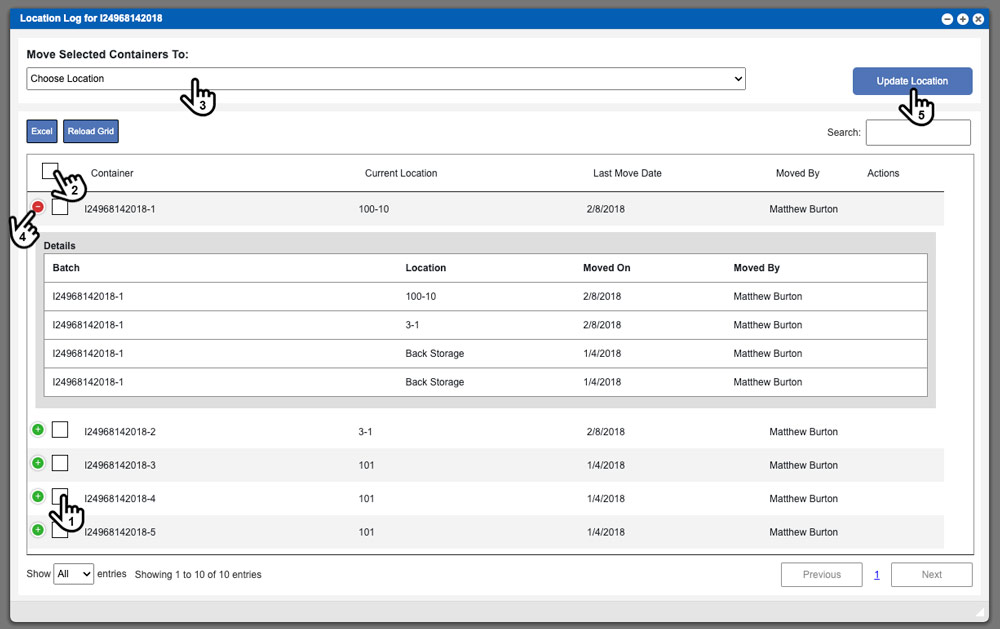
To view the location history of a container you can click the green icon located at the far left of the row (4). This will expand the row and display the history. See example image above.
Select a batch row and click the Split Batch action button to begin this process. Enter in your container size, count and measurement before clicking the “Split Batch” button. Once the batch has been split the system is going to remove all of the current containers in the batch and add what you designated in the Split Details. A new batch sticker will be printed allowing you to relabel all containers in the batch.

Grid Column Information
There are instances where a column title is not descriptive enough or there is a formula that is manipulating the column data. This section is an effort to explain those instances.
Modified: Here are all the ways that the Modified column for a batch can be updated:
Quarantine Inventory -> Quarantine Item
Quarantine List -> Delete
Quarantine List -> Release -> Release Batch
Quarantine List -> Release -> Reject Batch
Transfer Batch -> Create New Batch
Production Sheet -> Finalize Production
Scanner: Add Exception / Add Cycle Count Exception / Remove Cycle Count Changes / Zero Out Containers
Last Used: This column shows the last time that a component/ingredient was used in a BPR.
Batch Cost: This is the cost of the batch when it was received.
Available Cost: This is the cost of the batch based on the current amount in the batch. The system takes the CPU for the batch multiplied by the available amount.
Used in Production: That amount of the batch assigned to BPR’s.
Available: The amount of the batch that is availalble. This takes the amount received plus any +/- exceptions and totals them together. Exceptions also includes any amounts used in BPR’s.
