This section will contain general information about Virtual Ops, including calculations, process operations and acronyms. This page is a work-in-progress and will be continually updated with new information. Please click the links at the top of the page to quickly access each section.
Calculations
How is Bonded Amount on a quote calculated?:
The bonded amount in a quote is the amount that will be used to calculate the total amount needed of an ingredient for a BPR.
Here is an example of how the bonded amount is calculated.
Elemental Amount: 31.68MG
Assay Percentage: 90%
LOD Percentage: 10%
Intentional Overage: 10%
Calculation is as follows:
1. The Assay% is subtracted by the LOD. (90-10) = 80%
2. 100 is divided by the resulting Assay%. (100 / 80) = 1.25
3. To find the initial bonded amount the results from number 2 are multiplied by the Elemental Amount (1.25 * 31.68) = 39.60MG
4. Then the Intentional Overage is converted to a decimal and one is added to ensure the percentage amount is added to the elemental amount. (10 / 100) +1 = 1.1
5. Finally the resulting bonded amount is multiplied by the Intentional Overage Percentage. 1.1* 39.60 = 43.56MG
How are Inner Case components and Master Case components calculated?
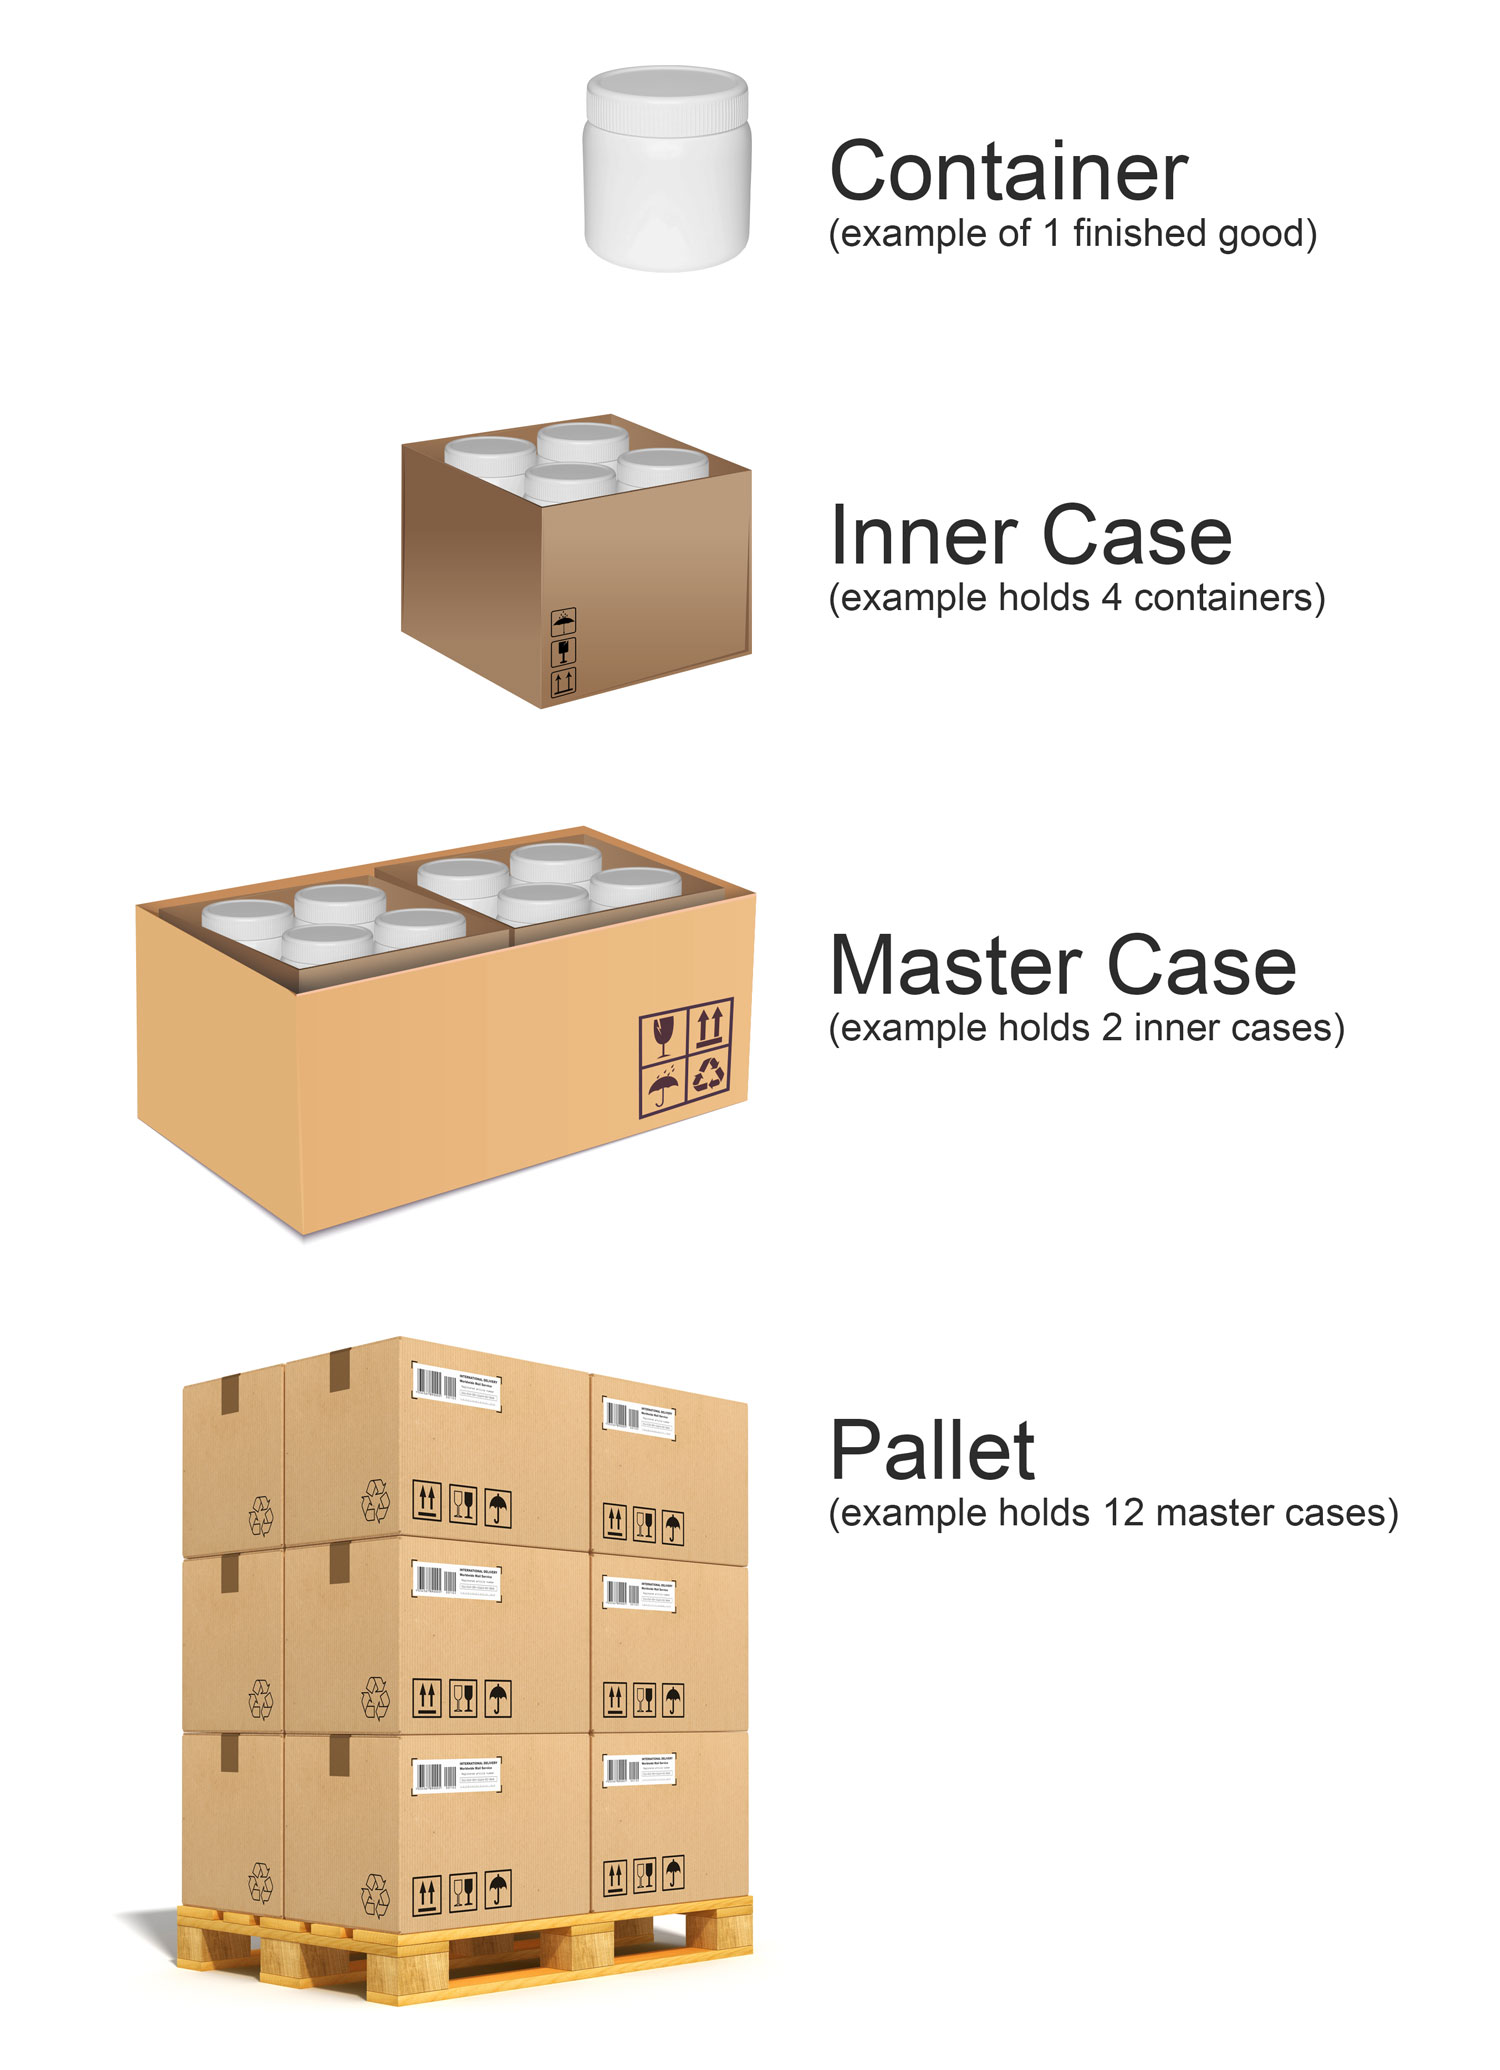
Inner Case components are typically items that are inserted inside of a Master Case. An example of an Inner Case could be a display box that holds 4 containers. Inner Cases that are required for an order are calculated by dividing the container count by the “Containers Per Inner Case” field. This field may not be labeled the same in your system as this item can be modified during your initial Virtual Ops setup process.
Master Case type components typically hold containers or Inner Cases (holding containers). Master Case types that are required for an order are calculated by dividing the Container Count by the “Containers Per Inner Case” field. Then divide the quotient by the “Inner Case Per Master Case” field. This field may not be labeled the same in your system as this item can be modified during your initial Virtual Ops setup process. 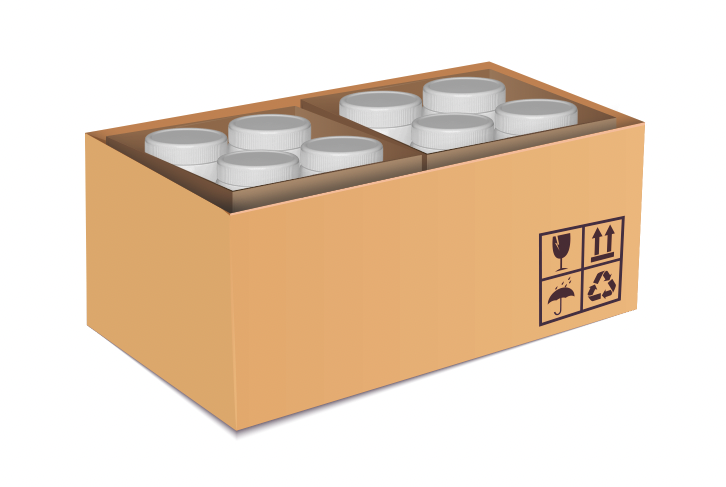
Example:
Container Count: 8
Containers Per Inner Case: 4
Inner Case Per Master Case: 2
Applied Formula: (8 / 4) / 2 = 1 Master Case
*Overages are ALWAYS rounded up
How are Pallet Label components calculated? (May not be applicable)
Pallet Label components are typically labels that are attached to a pallet. Pallet Labels that are required for an order are calculated by dividing the Container Count by the “Containers Per Inner Case” field. Then divide the quotient by the “Inner Case Per Master Case” field. Then divide the quotient by the “Master Cases Per Pallet” field. This field may not be labeled the same in your system as this item can be modified during your initial Virtual Ops setup process. 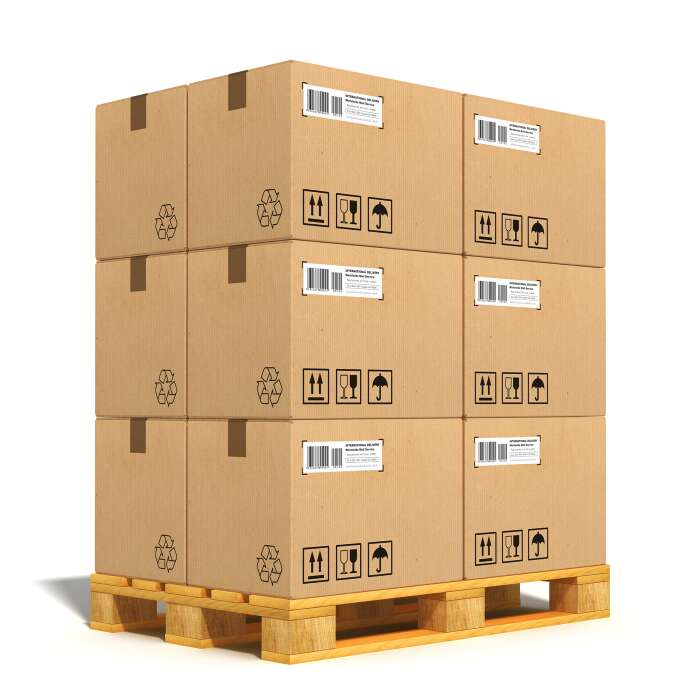
Example:
Container Count: 96
Containers Per Inner Case: 4
Inner Case Per Master Case: 2
Master Cases Per Pallet:12
Applied Formula: ((96 / 4) / 2) / 12 = 1
*Overages are ALWAYS rounded up
How is Brix amount calculated?
Bonded amounts need to be converted to the same units BEFORE proceeding with the formula. Once units have been converted to a similar base take the total bonded amount (sum of all ingredients) and divide that by the final brix percentage of gummy (this percentage will also need to be converted before dividing).
If the total bonded amount is less than the final brix amount it will turn red.
How is the Quote and BPR Cost Breakdowns calculated?
FORMULAS FOR INGREDIENTS:
(((Bonded Amount x Cost Per Unit) x Servings Per Bottle) x Container Count) ÷ Pills Per Serving = Total Batch Cost
(((Bonded Amount x Current Cost) x Servings Per Bottle) x Container Count) ÷ Pills Per Serving = Total Current Cost
*Cost per unit is the cost in the BPR/Quoted
FORMULA FOR COMPONENTS:
Formula: QTY Needed for Batch x Current Cost = Batch Cost/System Cost
For a more in-depth view at this calculation please view this page.
Acronyms
BPR = Batch Production Record
CPU = Cost Per Unit
ETA = Estimated Time of Arrival
PR = Production Record
MMR = Master Manufacturing Record
PO = Purchase Order
LPN = License Plate Number
QA = Quality Assurance
WIP = Work In Progress
Glossary of Terms
This section will contain both visual and textual definitions for terms used with the Virtual Ops system.
Components: All materials in the system used to create a formula for production is a component (ingredients / packaging / production materials etc.).
Component Type: This is a grouping or category of components (Master Case, Lids, Bottles etc.).
Containers: This component is the container that the product will be contained in. Typically used in all jobs. See visual representation example in image below.
Container Box: This component is usually a smaller box that containers a single product. Typically used in liquid bottles to house the bottle the liquid comes in.
Capsule: This component is the holder for the raw ingredients to be contained in. Typically used in Capsule jobs.
Cotton: The cotton that is placed inside a bottle to fill the empty space in a bottle.
Cut Band: This component is typically used to seal the top of a container for a finished good.
Desiccant: This component is typically added to a container to be used as a drying agent.
Film: This component is typically added to sachet job type.
Ingredient: The raw ingredients in a formula. Used in all job types.
Inner Case: This component is used to add promotional material, grouped containers or any other type of insert into a case of a finished goods. See visual representation example in image below.
Insert: The insert that is typically added to a container to prevent moisture. Typically used in any job type with a container.
Job Types: This refers to the type of production(s) that your company produces. (Capsules, Liquids, Powders etc.)
Label: This component is applied to the container of a finished good.
Lid: This component may accompany some containers. Typically used in any job with a bottle or jar.
Manufacturers: These are the creators for components used in your system. Manufacturers supply Vendors components for distribution.
Master Case: This component usually holds the final product in multiples on a pallet or as display cases for a finished good. See visual representation example in image below.
Master Case Label: This component is typically added to jobs with a master case.
Nitrogen: This component is typically added to liquid job types.
Pallet Label: This component is typically added to jobs that will be using a pallets.
Poly Liner: This component is typically added to powders job types for internal use with ingredients.
Scoop: This component is a tool used for measuring a serving for a finished good and is typically inserter/included inside the container of a finished good. Typically added to powder job types.
Vendors: These are the distributors and providers of components that are used in your system.
Grid Sorting Options
There are several ways in which you can sort the grid in order to find specific results fast. If you know the name of the item you are searching for then using the Search Box will be your best bet.
You can also sort grid results by clicking the Column Titles. In doing so you will change the sort results per the column from high to low; click again to sort the opposite. See example image below.
There are also specific filtering options available per each grid located at the top. Some of the more common filtering options are: Status and Search by:
You can combine any of these sorting options in order to find the item that you are searching for.

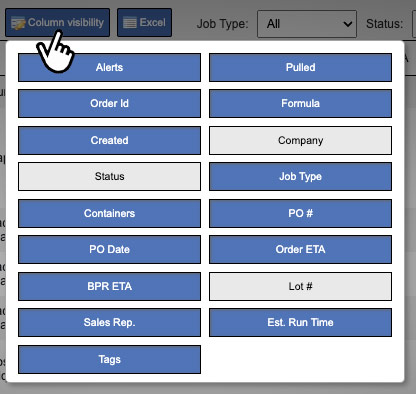
Column Visibility
Column Visibility will allow you to toggle on/off columns on the grid. Start by clicking the Column Visibility action button located above the grid. In the next window you will select columns to hide/show from the grid. Column buttons that are blue are visible on the grid and Column buttons that are gray will be hidden. See example image below.
Please note that the columns you decide to hide will remain hidden until you re-select them for visibility. This setting is stored/saved per the browser used while selecting Column Visibility.
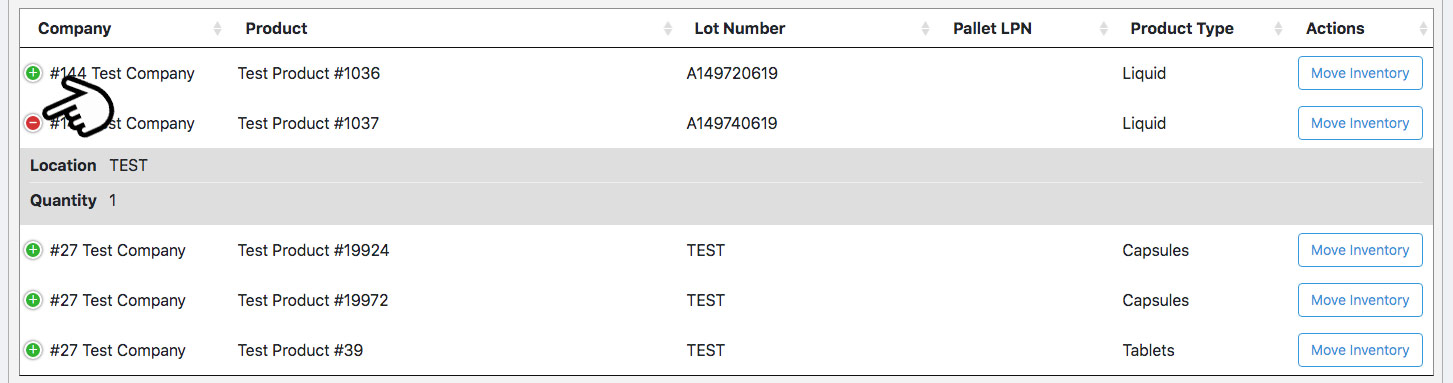
Grid Nesting
In the event you are using the website with a small monitor or lower resolution the grid will nest column elements into each row. This is indicated by a green plus icon at the furthest left point on each row. Click the plus icon to reveal the additional columns and their info. See example image below. We recommend using the website with a minimum monitor size of 20″ with a 1920 x 1080 resolution.
Grid nesting will sometimes be available regardless of screen size and in this event the grid nesting will contain/display for information.
Help Pages
In the event that you are faced with a section or option within the system that you are not sure how to operate you can always refer to these help pages. You can jump directly to a specific help page from the system by clicking the “?” icon. Clicking this icon will open a new browser tab with the specific help page per the grid/page/section that you are in. The icon is located at the top right of the window, in front of the minimize, maximize and close window icons. See example image below.

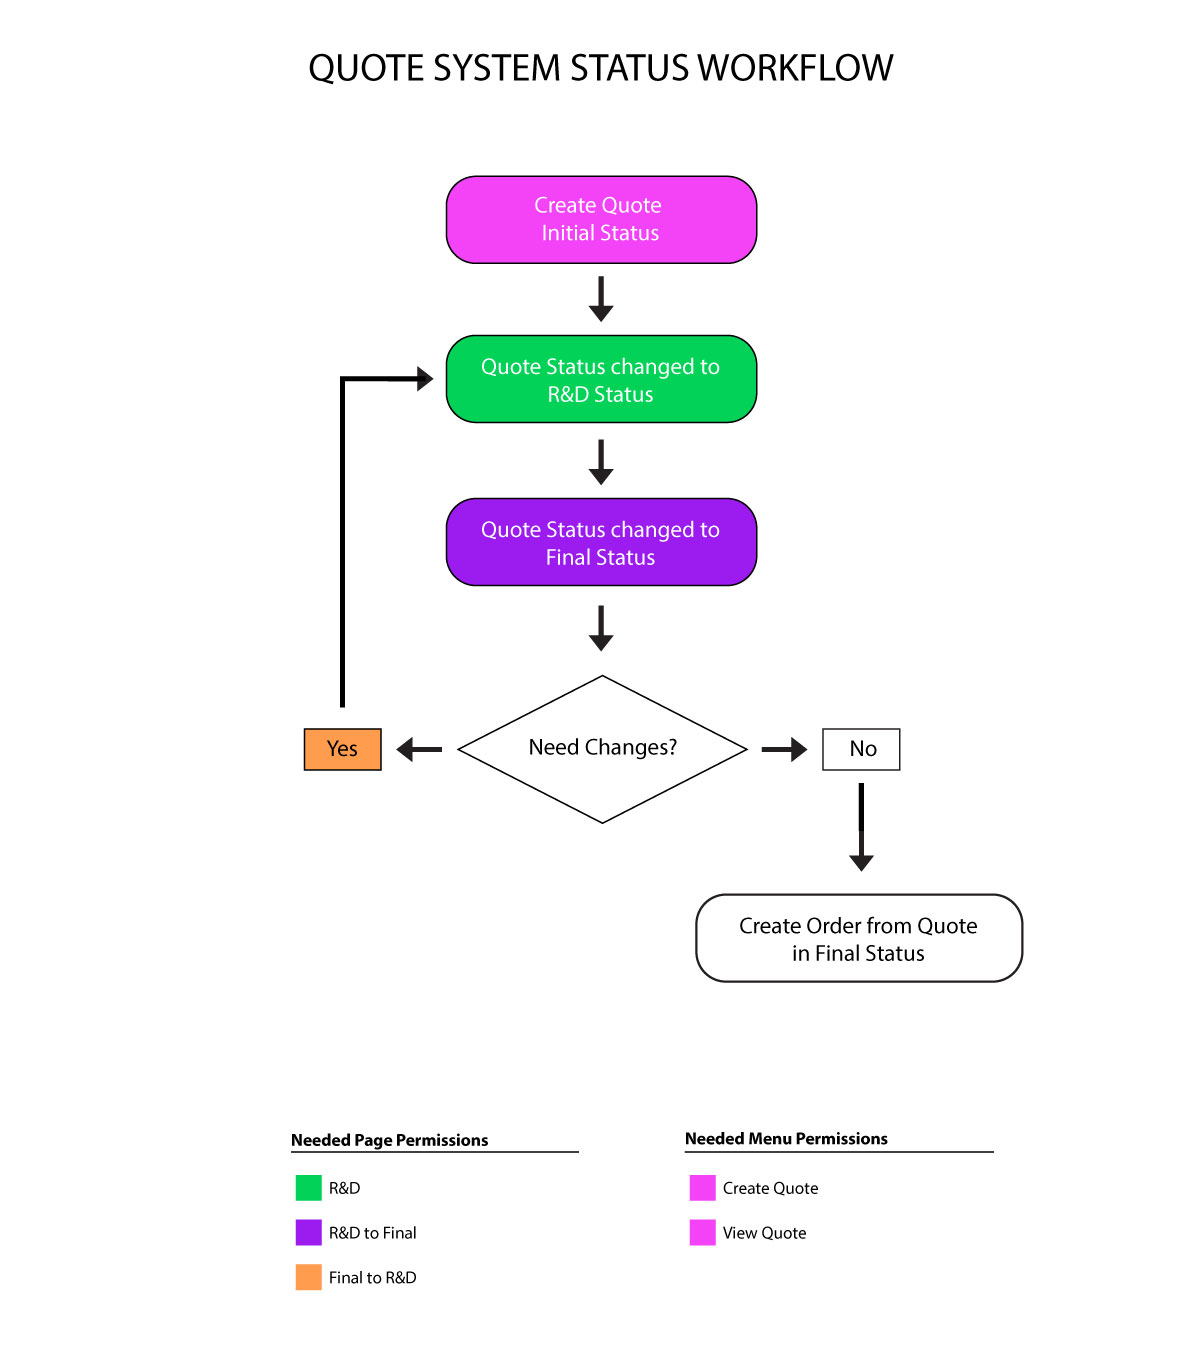
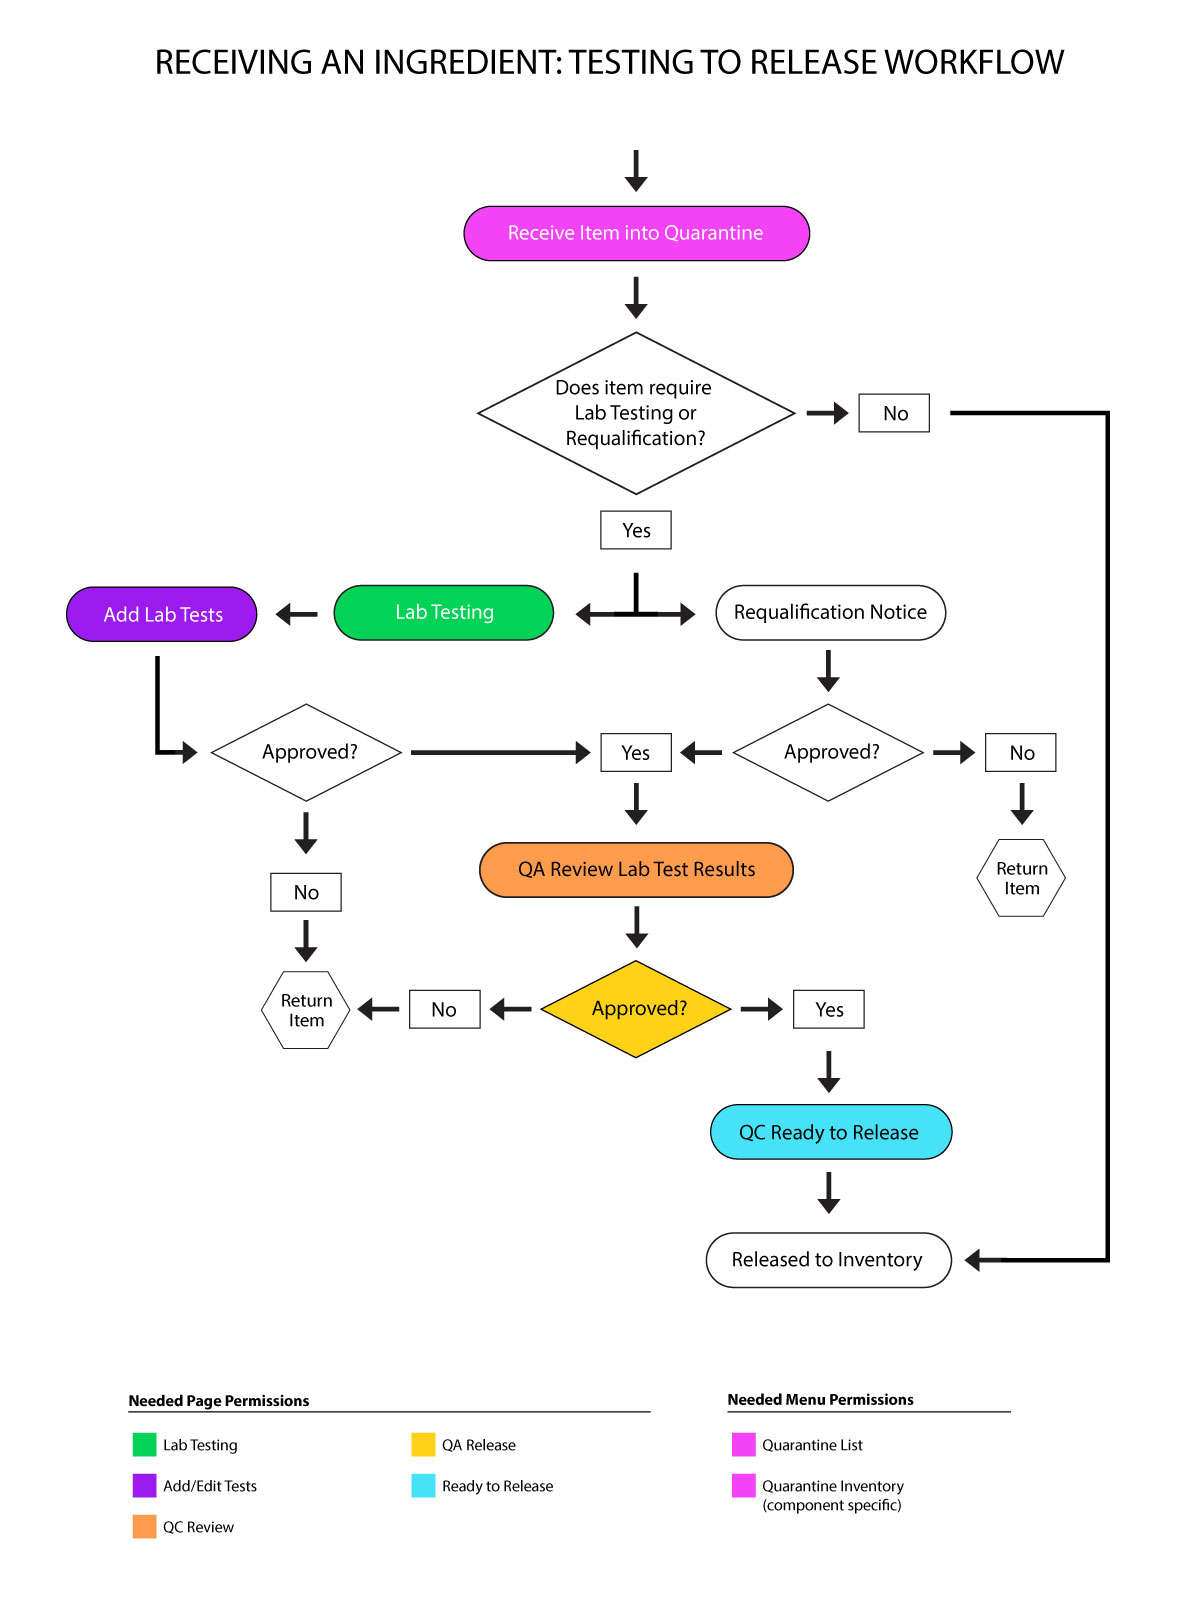
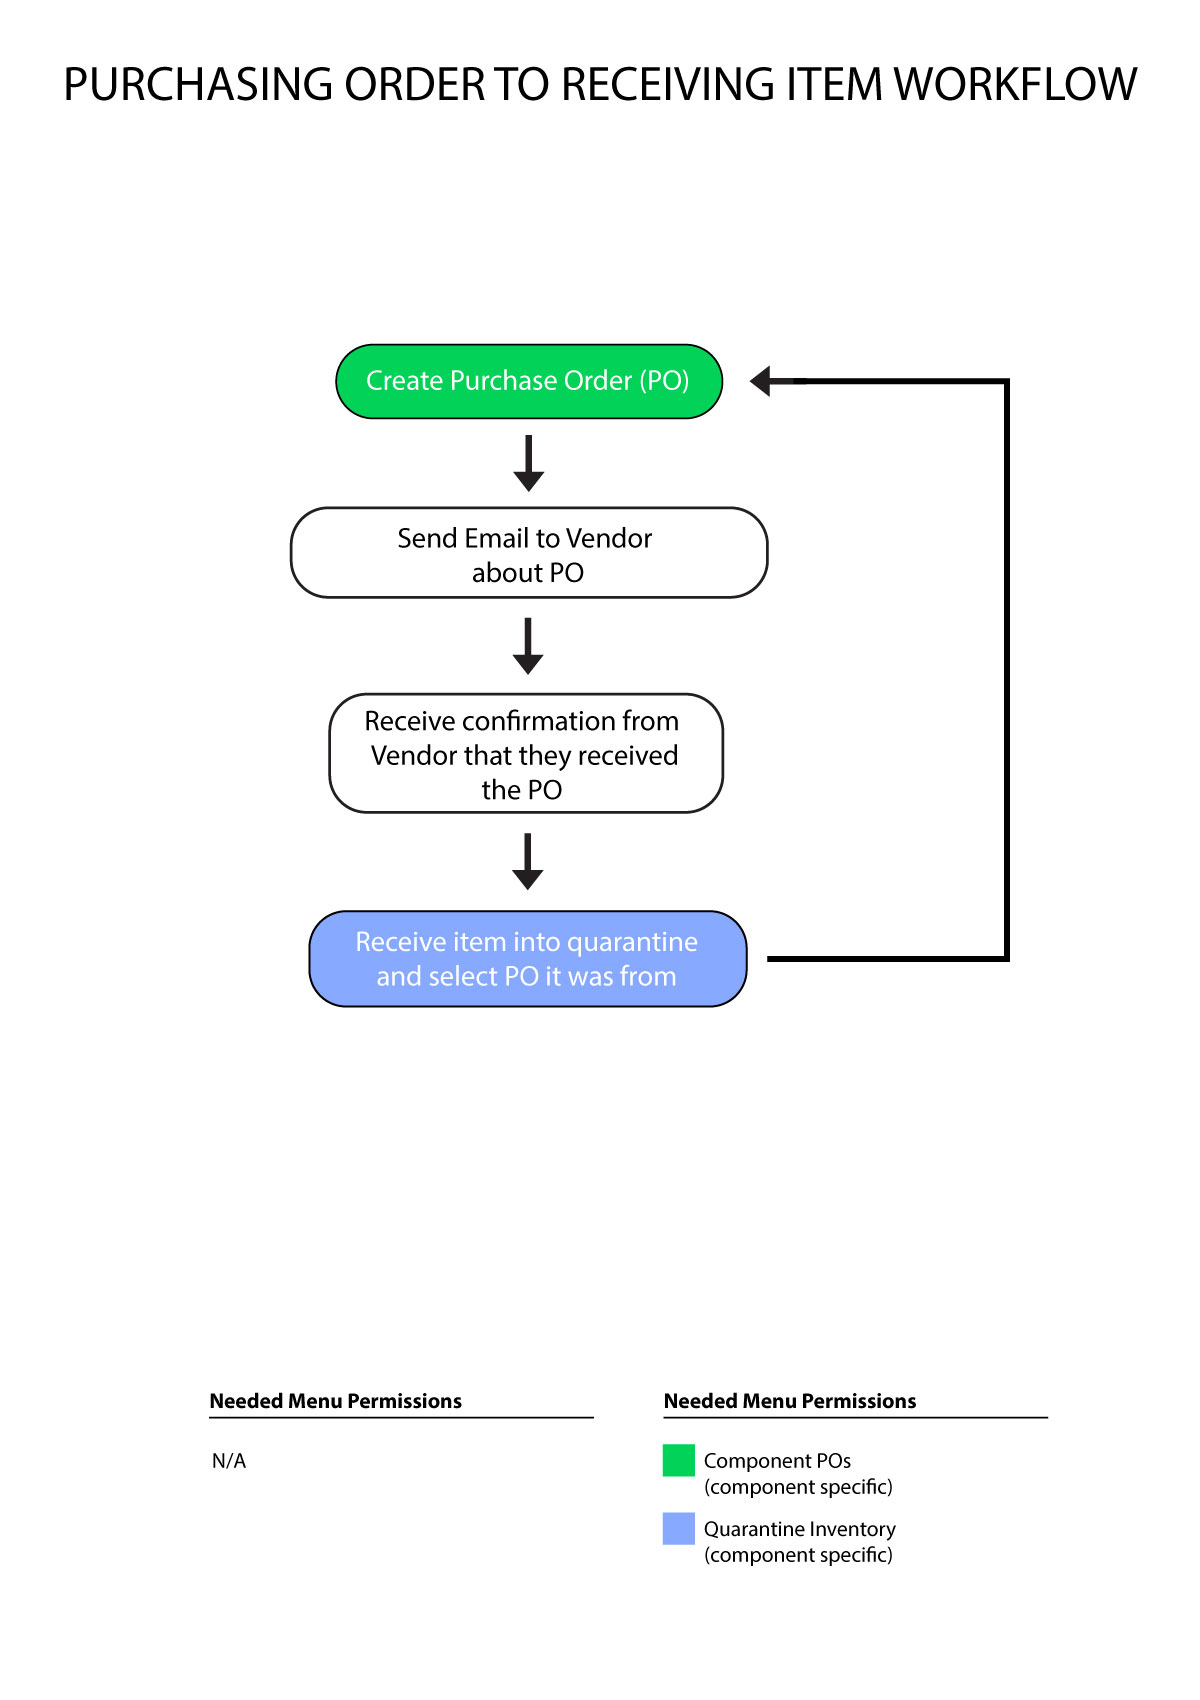
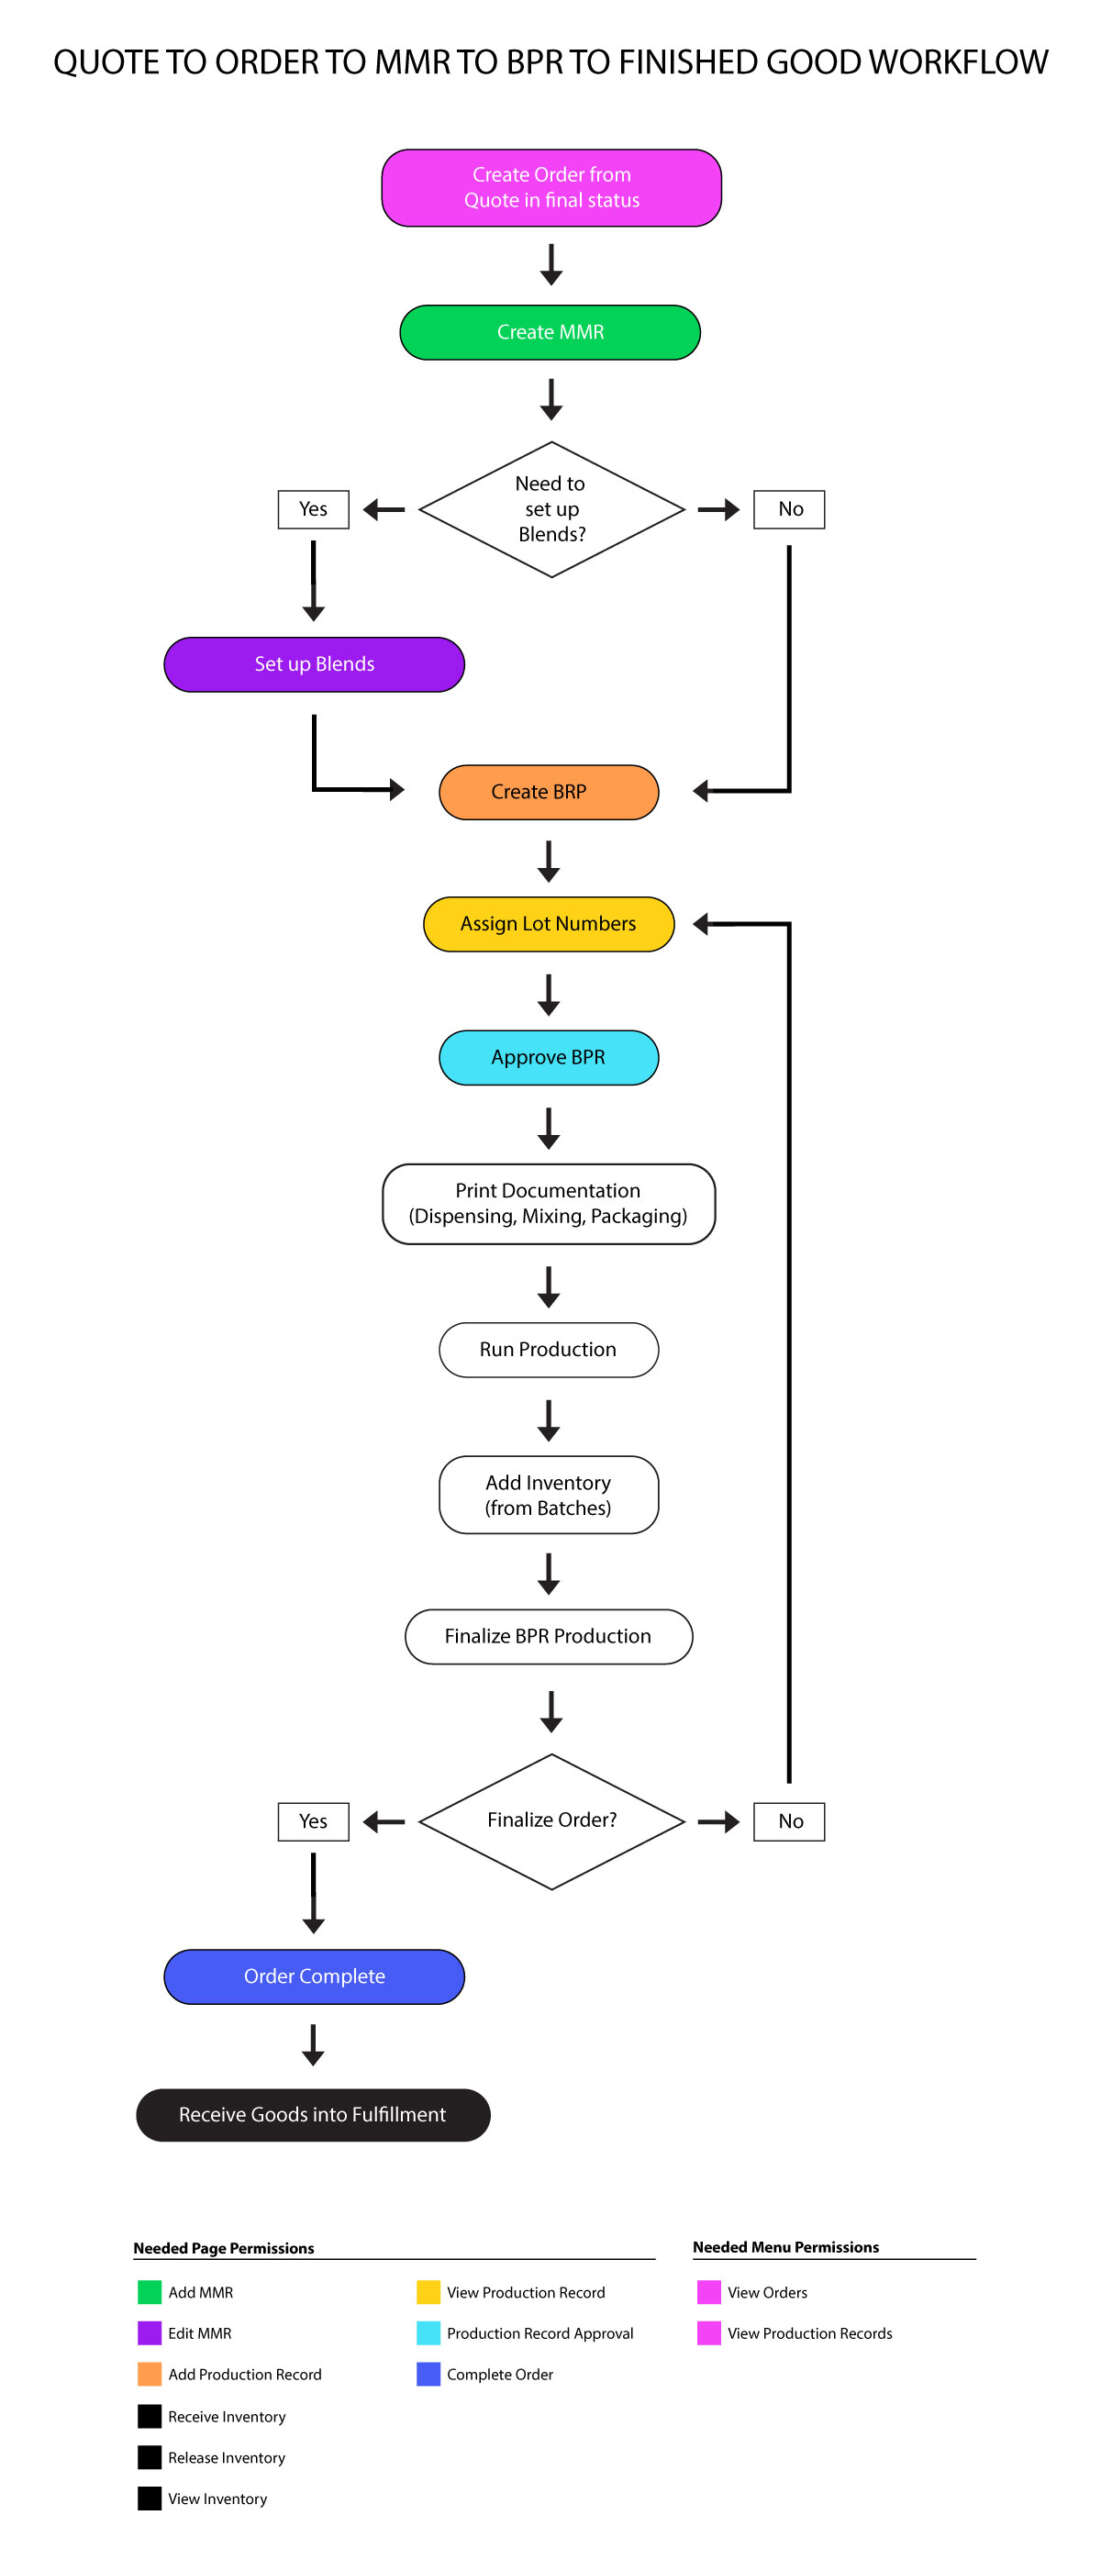
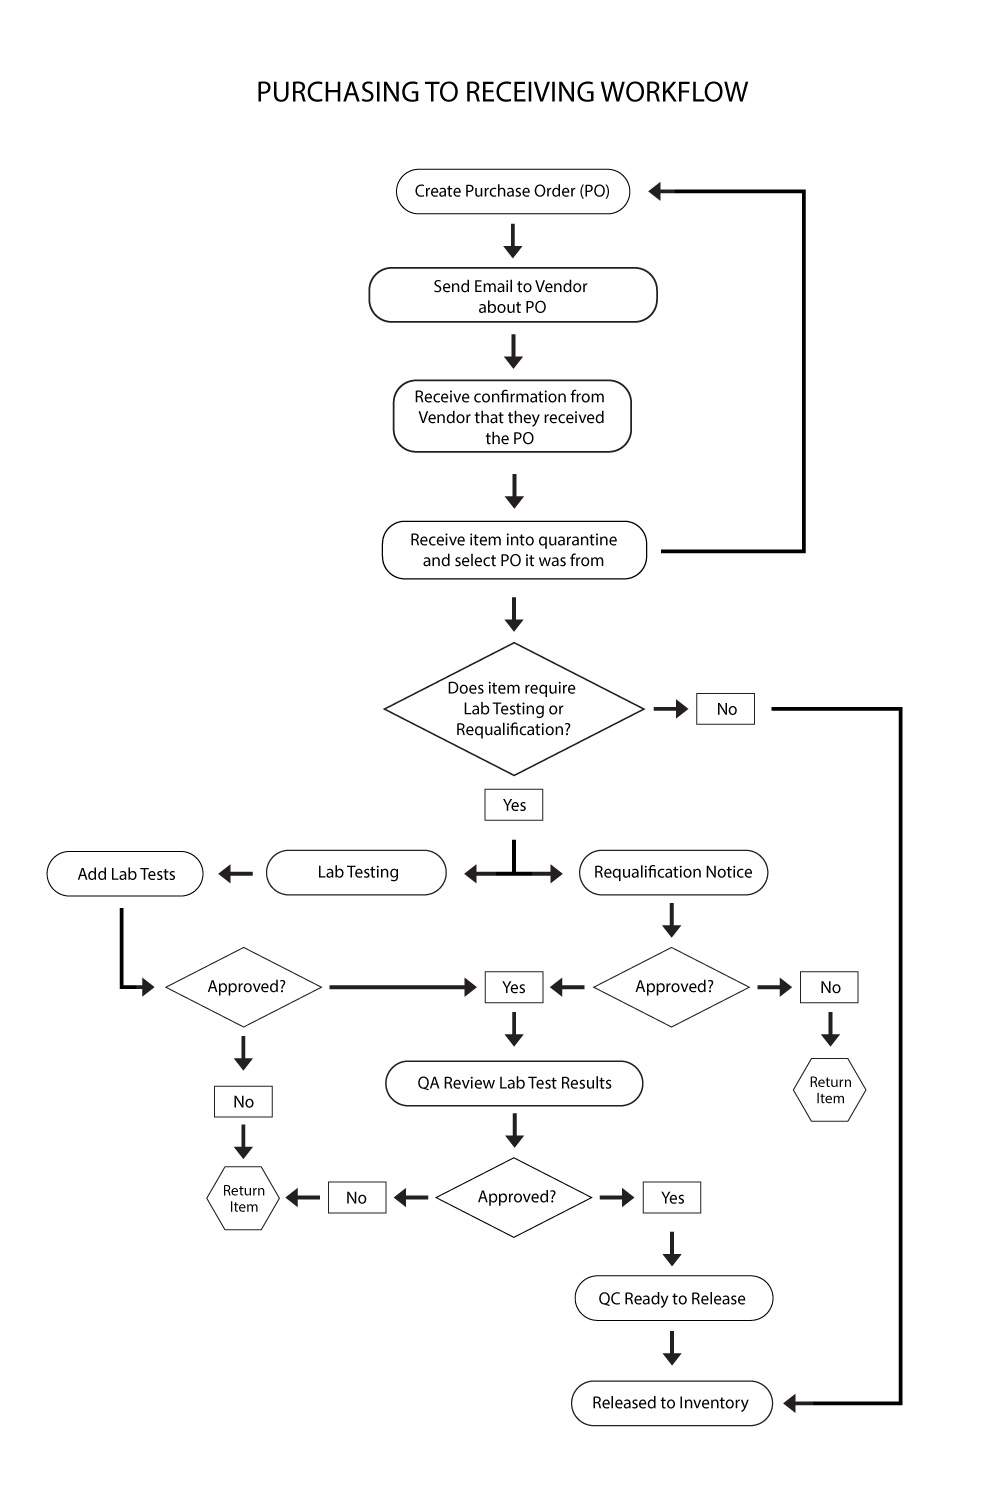
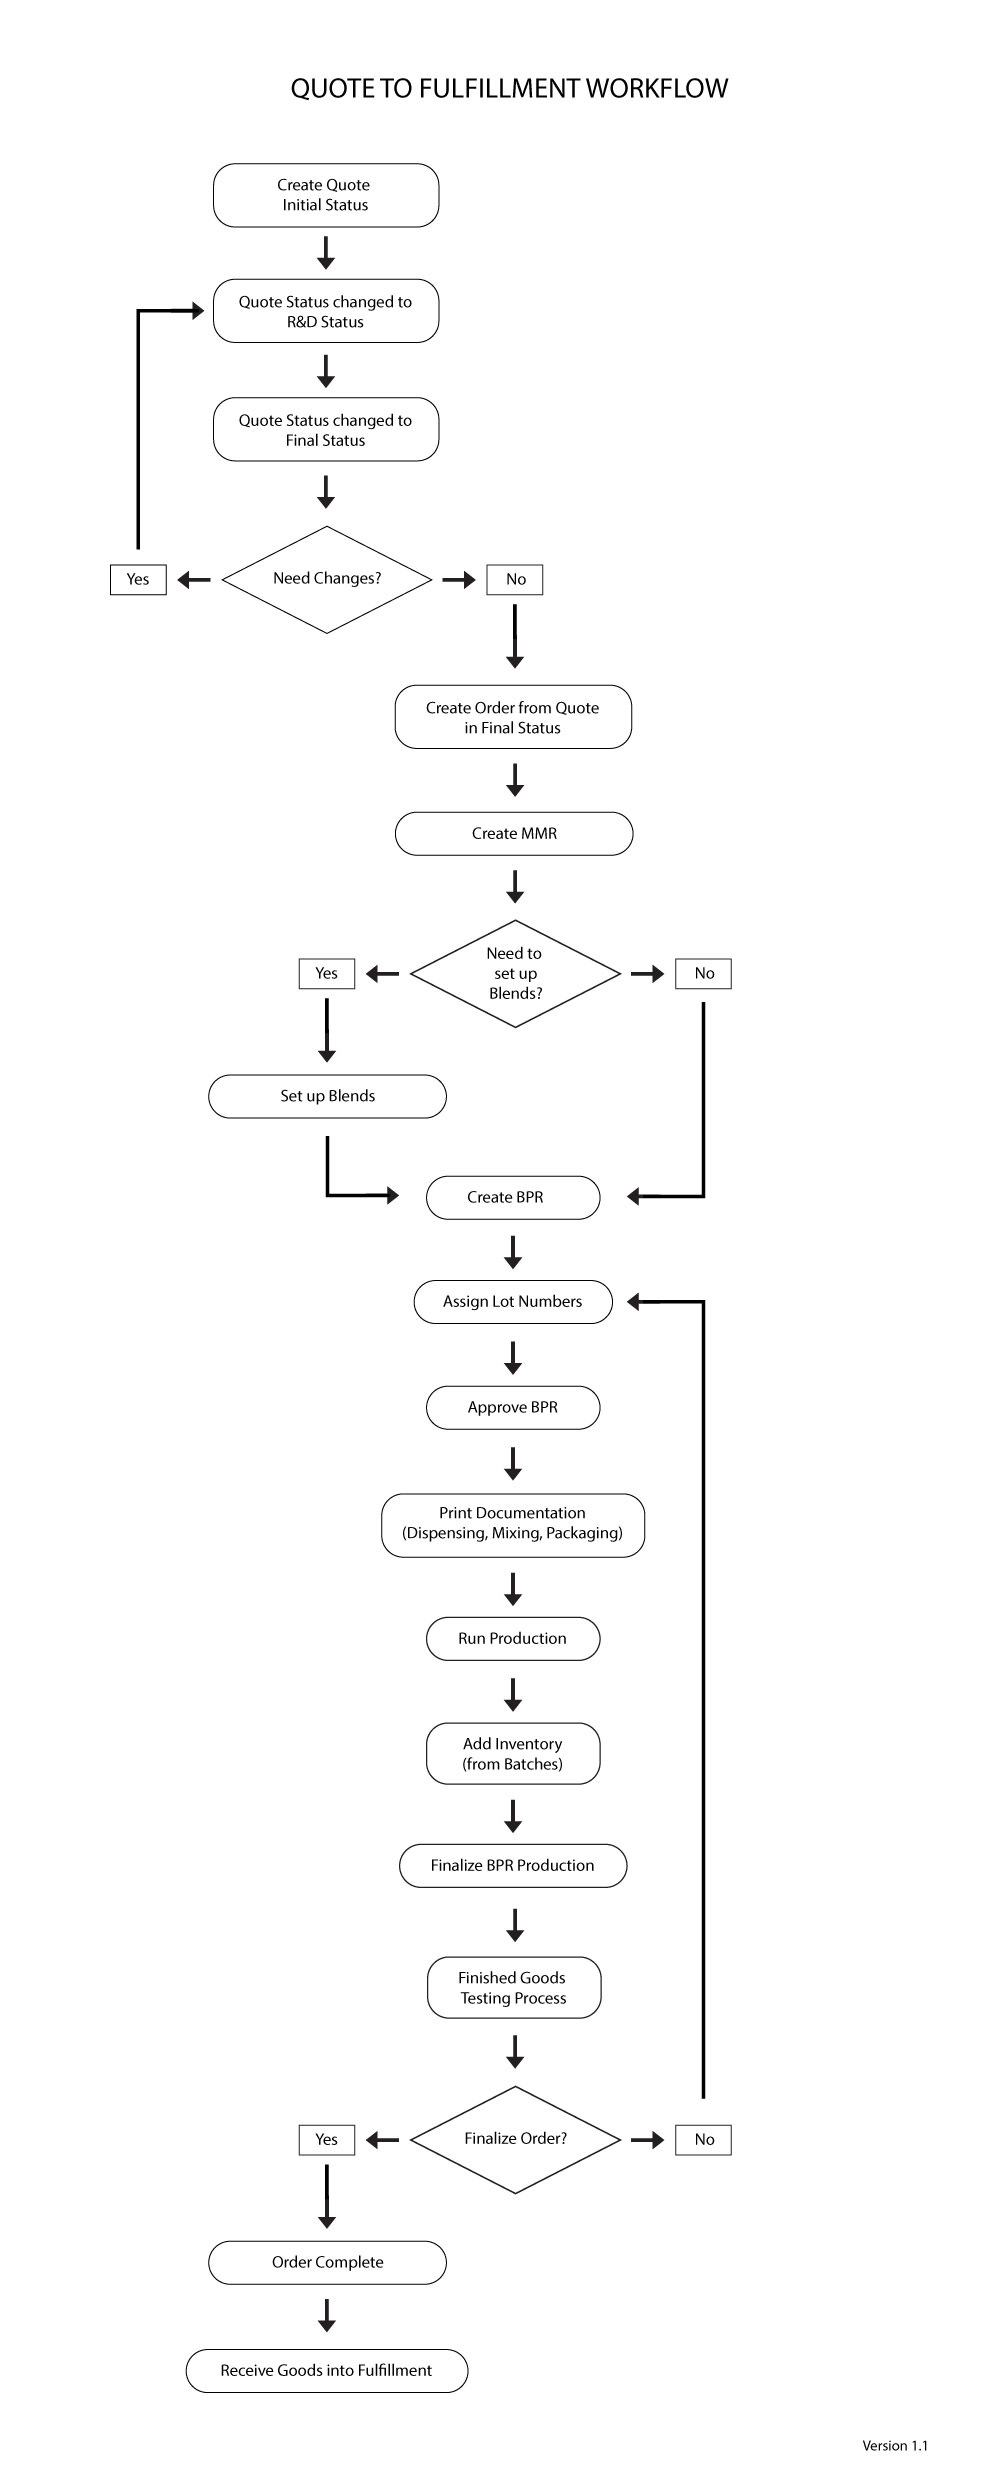
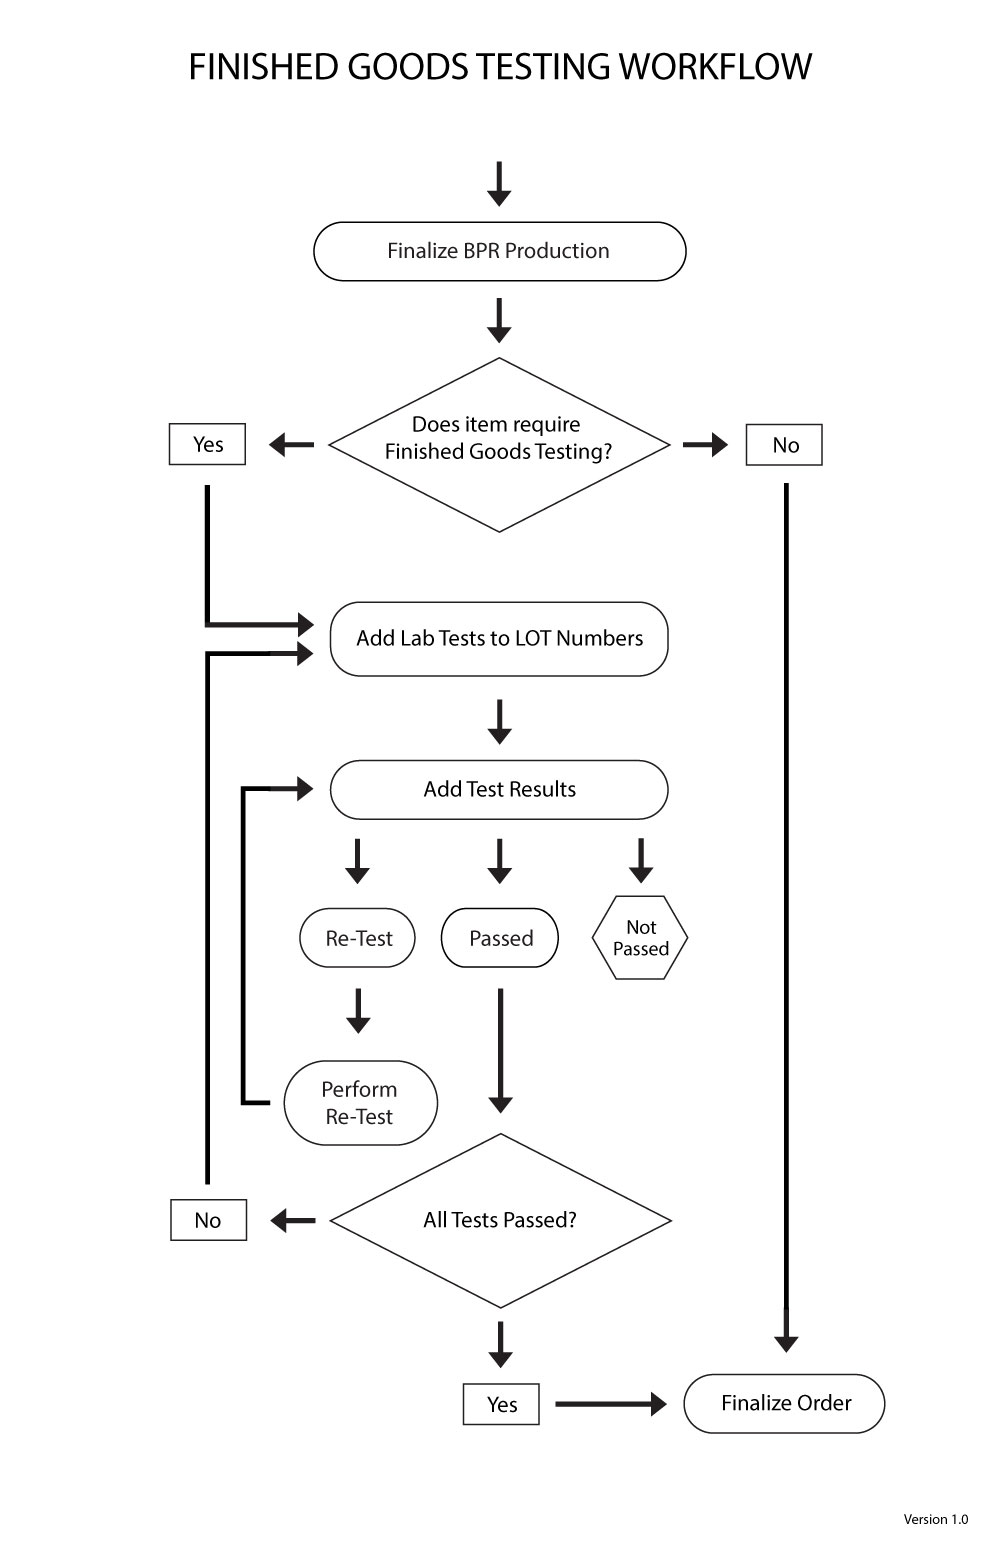
Workflows
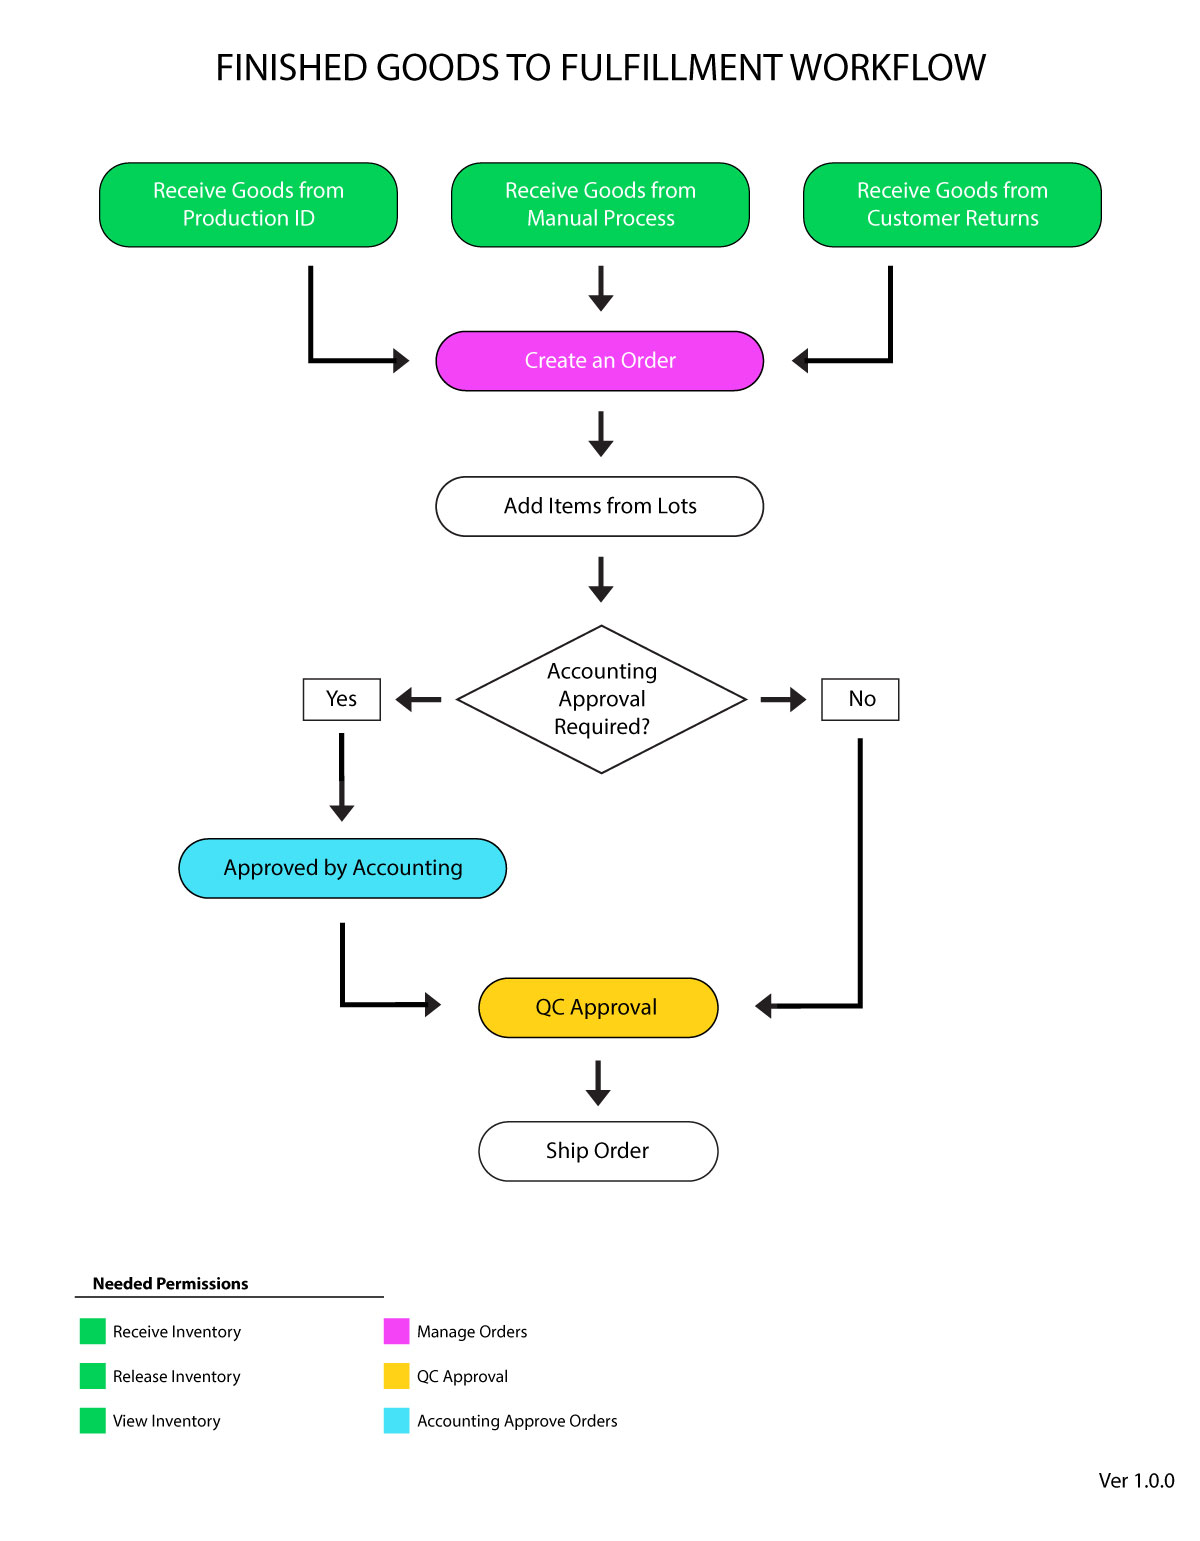
This section will contain all workflow diagrams created for the Virtual Ops system. The first two workflow diagrams below outline the most commonly used processes within our system. Click the images to enlarge and or download them.
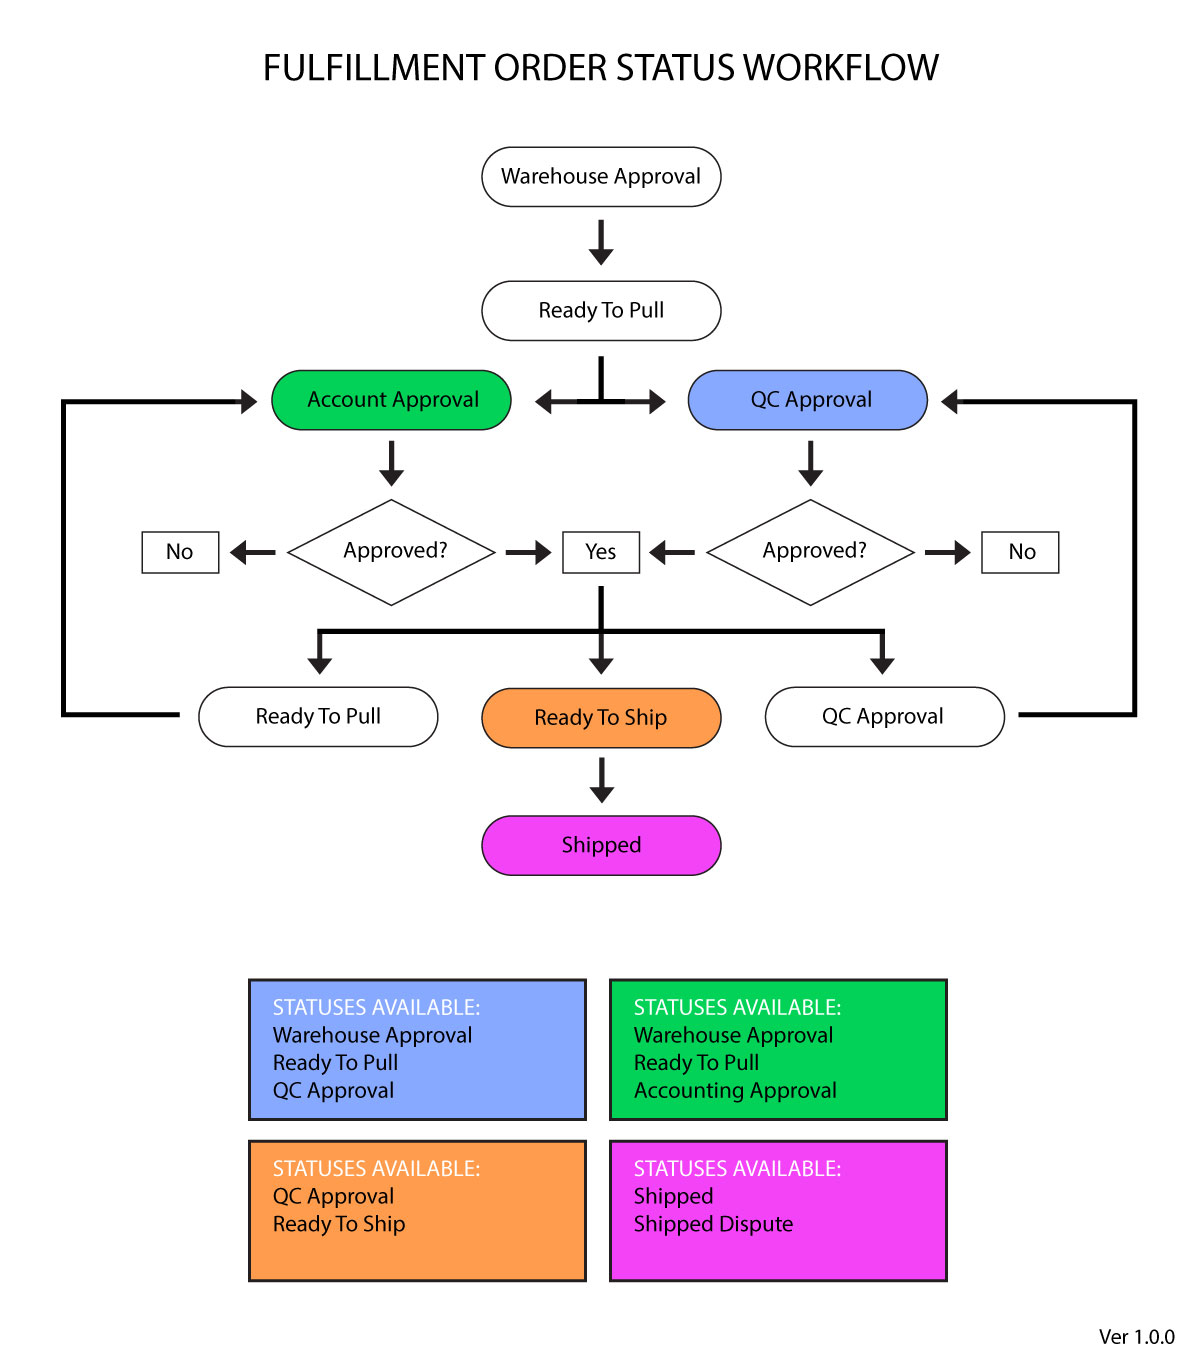
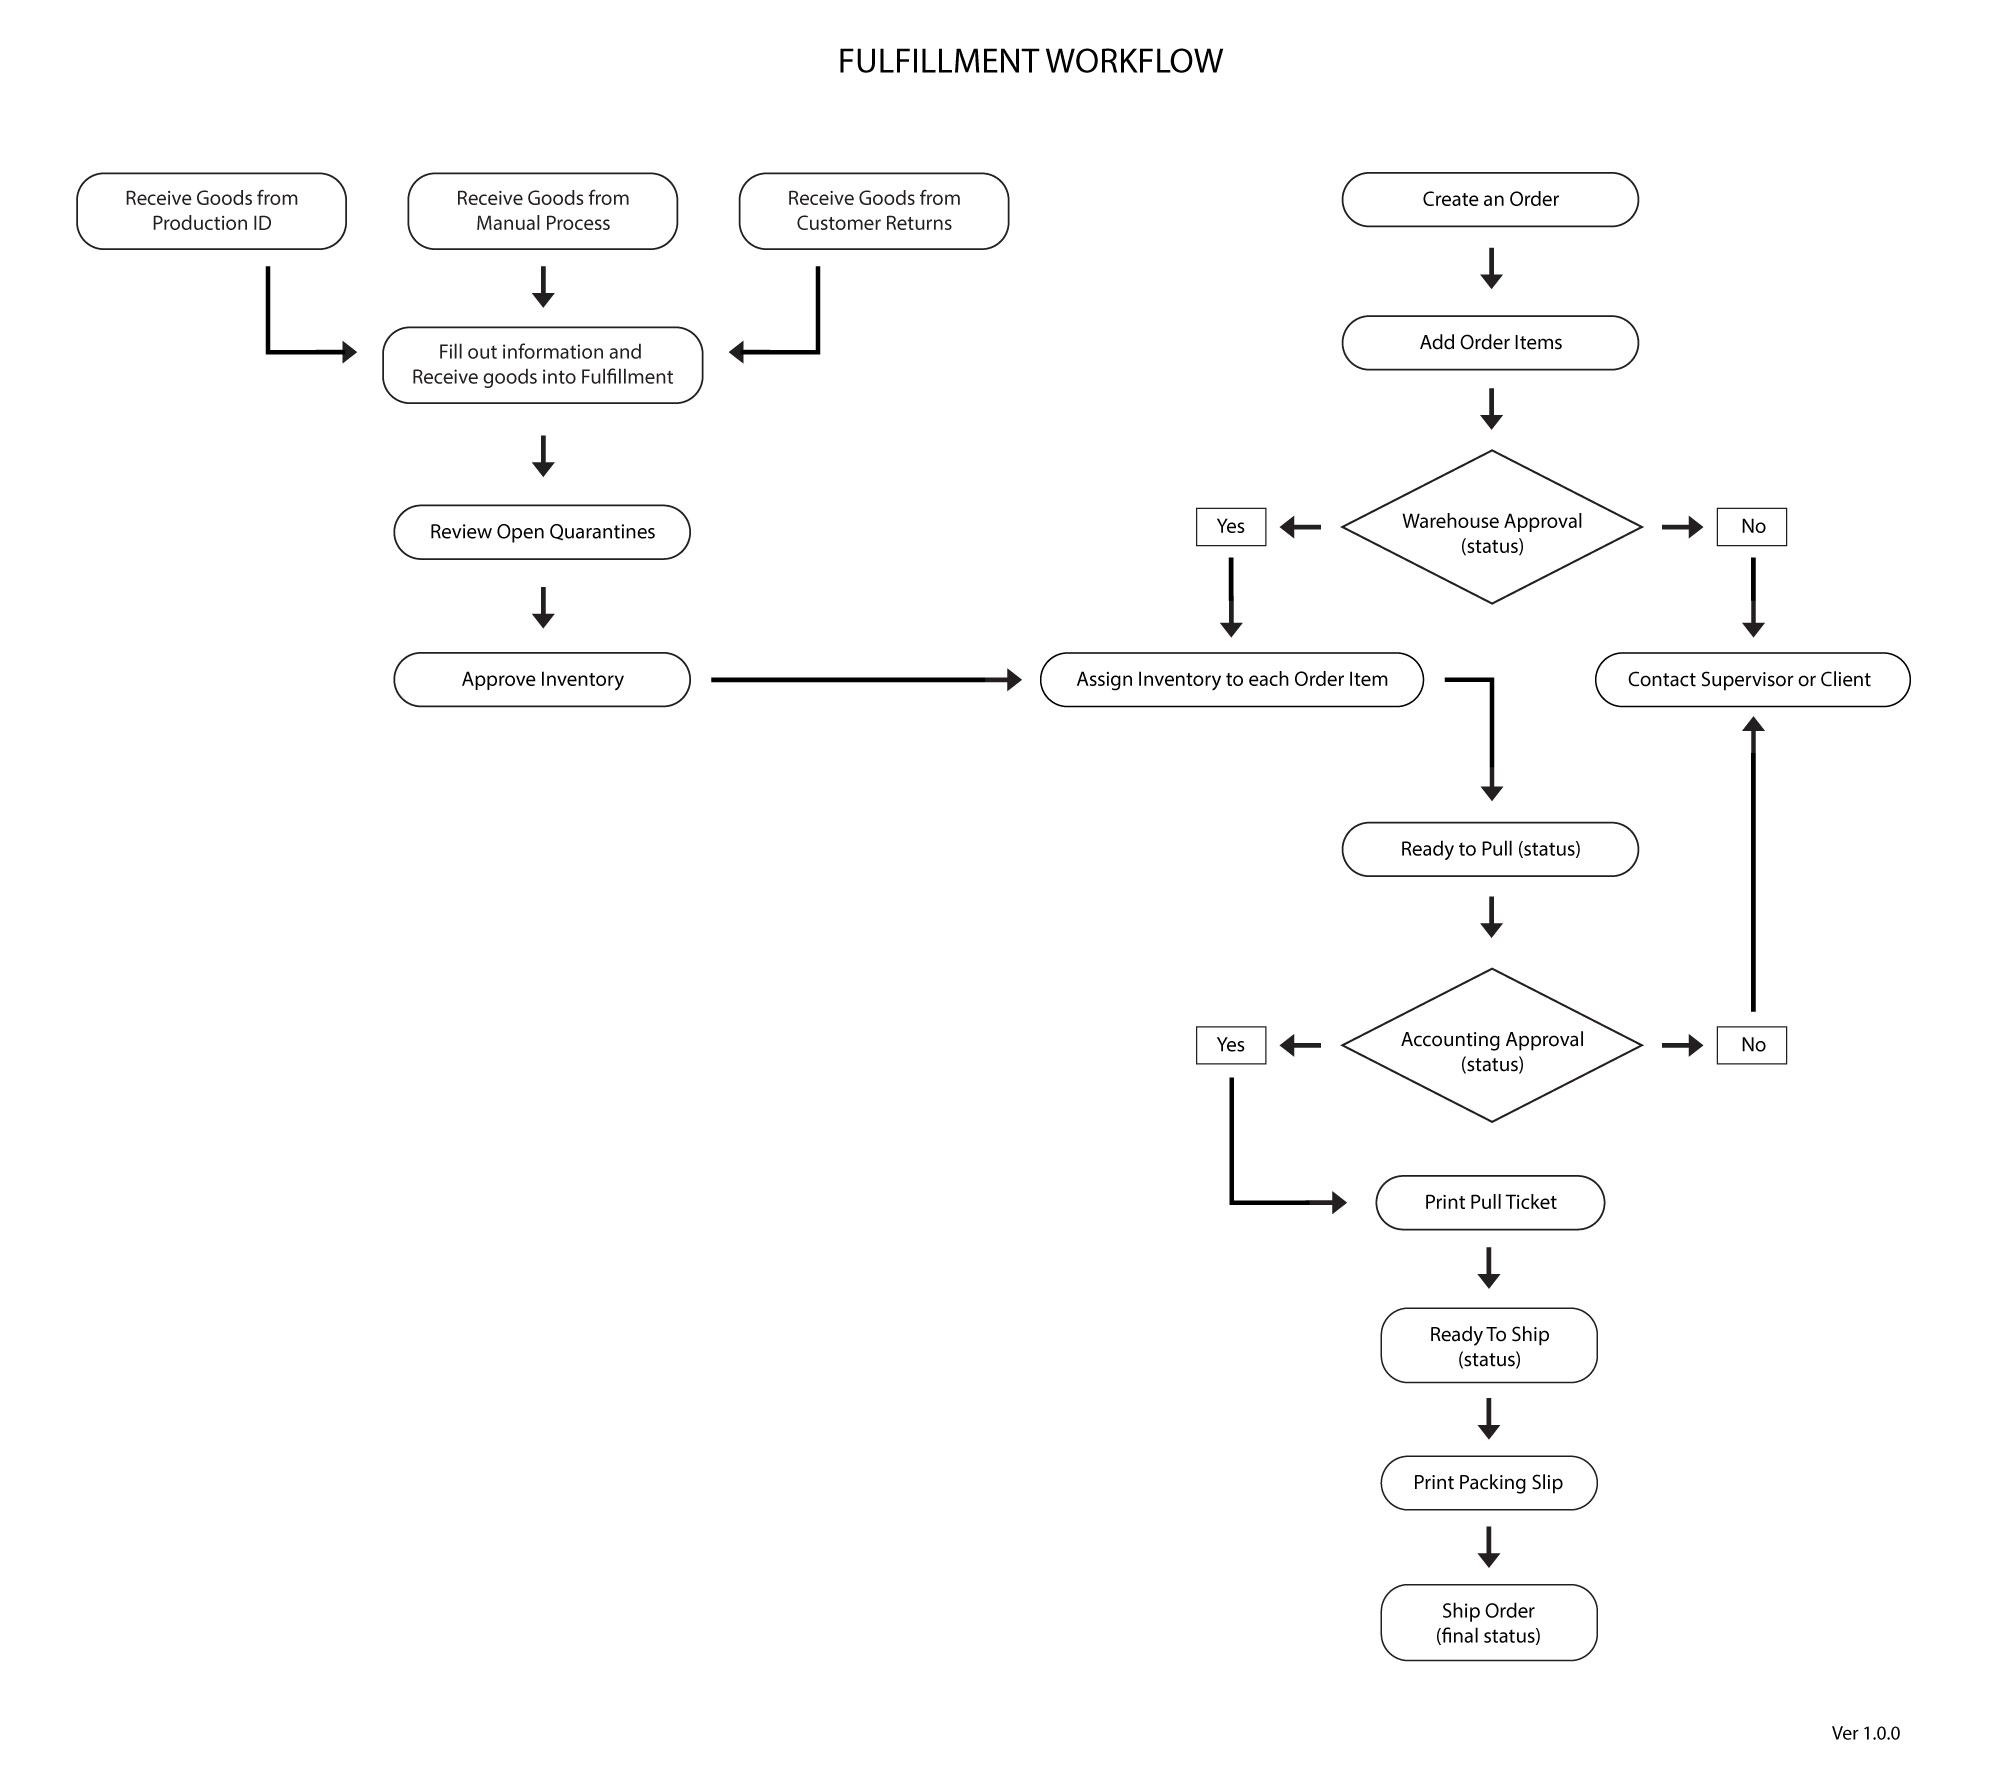
Fulfillment Workflows
This section will contain all workflow diagrams created for our Fulfillment Software System. Click the images to enlarge and or download them.
Page and Menu Permissions
This section will contain all Page and Menu Permissions workflow diagrams created for the Virtual Ops system. These menu and permission settings are imposed into the existing workflow diagrams to better help illustrate their function and use. Click the images to enlarge and or download them.