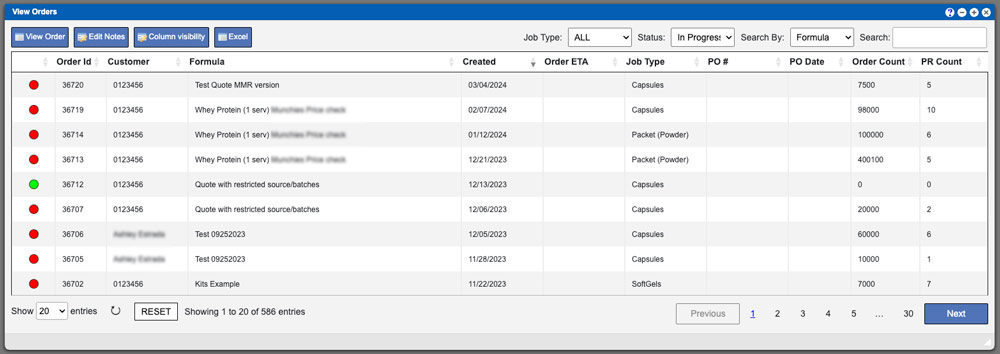
The View Orders grid will display all orders in the system. These entries can be sorted by clicking the column titles, using the search function or filtering by additional options. For more information on Grid Sorting click here.
Virtual Ops System Location/Navigation:
Production > View Orders >
Quick Links
Testing Charges
BRP Tab
MMRs and Blends
Grid Action Buttons
View – Once an order from the grid has been selected this action will allow you to view and or edit the order.
Edit Notes – Once an order from the grid has been selected this action will open the order and automatically have the notes tab selected. This will allow you to view and or edit the order notes. (Anchor link to below)
Excel – Selecting this action will export the currently displayed grid data to excel.
Column visibility – By selecting this option you can change the visible columns per the grid you are on. These selections are saved per user/browser per grid.
Grid Status Dropdown Legend
This dropdown will sort entries in the grid per the status selection. We have a description of each of these statues below.
In Progress – This status encompasses the following statuses: New, Production and Locked.
New – This status is the initial status of the order when it is created.
Production – Orders are moved into this status when a BPR is printed and put into production.
Locked – This status occurs when a user has locked an order.
Completed – This status is set when production is completed for all BPR’s on the order and the user marks it as completed.
Deleted – This status is set when a user marks an order as deleted.
Order Alerts
Order alerts allow you to quickly view weather a production record can be completed or not. Order alerts are displayed on the view production records grid in the form of colored dots located on the far left side of each row. The Virtual Ops system has two built in order alerts but more can be customized using the appropriate administration menu.
Red Circle = Not enough to complete production record; missing components.
Green Circle = All components are available and production can begin.
Let’s go over a quick overview for the Order process in the VO system before getting to the specifics. When an order is initially created in the system you will first set the Order Details as listed below. Next you will set up the MMR for the order. Once the MMR has been setup you will then create the appropriate amount of Batch Production Runs (BPR’s) needed to complete the order. Once a BPR has been printed for production the order status will be automatically updated to: Production Status. There are additional processes involved that we will cover below. We also have a helpful workflow diagram for the most used processes that can be viewed here.
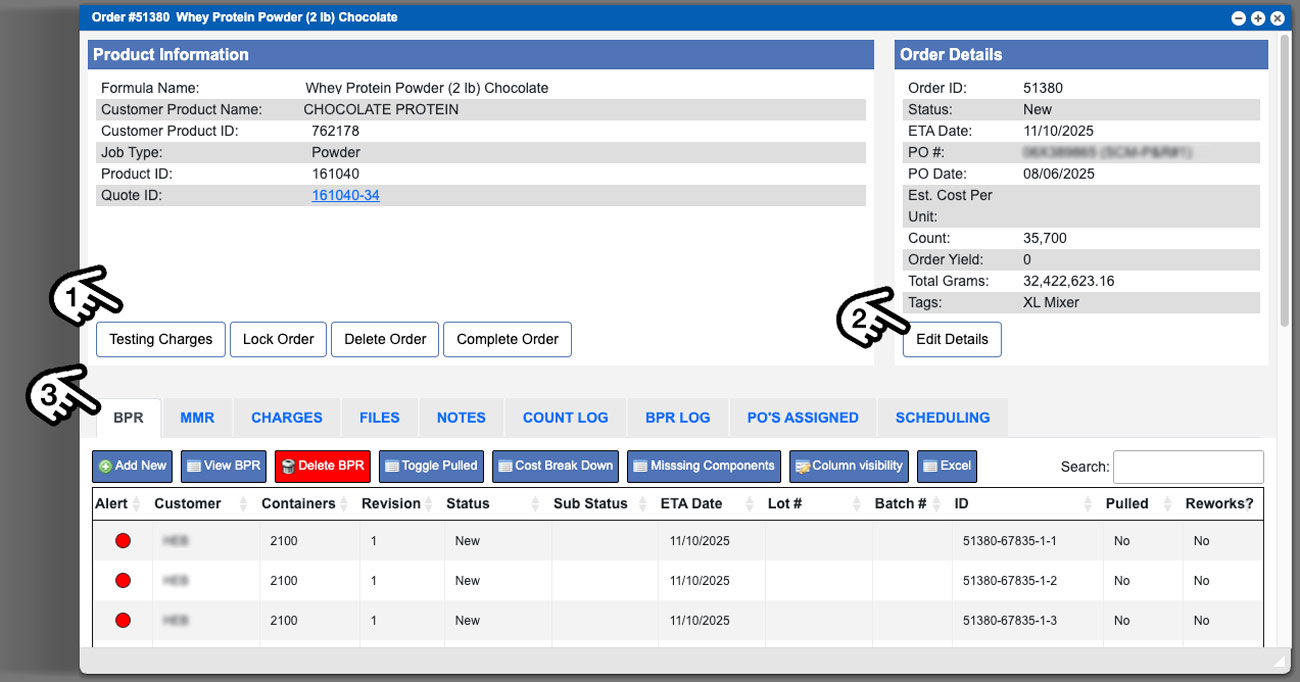
Order Action Buttons: (1)
Testing Charges – See info below
Lock Order – The Lock Order action button will allow you to lock an order from being edited.
Delete Order – This action will remove the order from the system.
Complete Order – This will complete the order. The order can only be completed once all BPR’s have been removed or completed.
Edit Details (2)
When viewing an order you can Edit the Order Details by clicking the “Edit Details” button located in the upper right side of the window under the Order Details block. Then you can set the ETA date, PO Number, PO Date, Order count and Tags by inputting values into the input boxes and clicking the “Save changes” button. See example image below. Please note that once an order is in the Production Status/Phase the Order Details cannot be edited.

Testing Charges (1)
The Testing Charges action button will allow you to add additional charges to the order. Once the special charges window is open you can add testing to an order by selecting them from the dropdown and then clicking the “Add Test” button. See example image below. Adding additional or manual testing charges can be accomplished in the Charges tab. All Charges for an order will be listed in Charges Tab in the orders window.
The lower portion of the Orders Window contains several Tabbed Sections. These sections can be accessed by clicking the Tab titles (3). See order window example image above – click to enlarge.
BPR Tab
This tabbed section will display a grid that contains all BPR’s for the order. All of the typical grid sorting actions can be used. The “Add New” BPR tab action button will pull up a new window that will display all available MMR’s for this order and allow you to create BPR’s as needed.
Select the required amount of BPR’s via the dropdown (for any available MMR) and then click the “Add BPR” button to complete the process. Please note that all BPR’s created in this way will each contain the total MMR amount. For example: If an MMR is for 500 containers and you add 2 BPR’s, the system will create 2 BPR’s for 500 containers each. See example image below – click to enlarge.
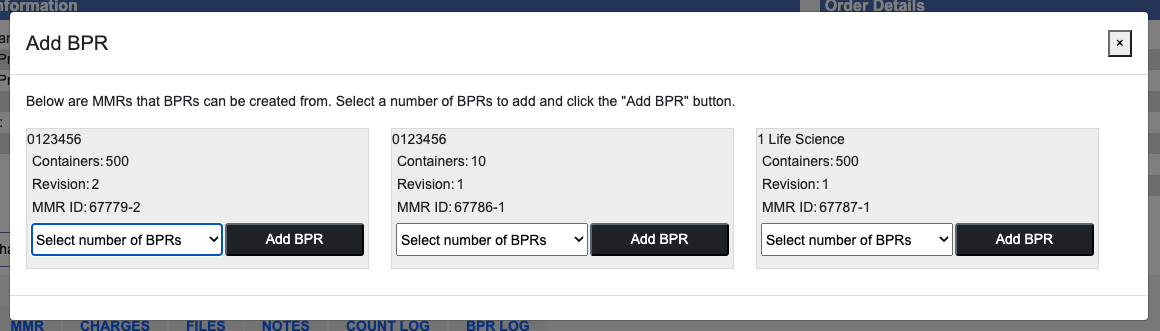
The “Toggle Pulled” BPR tab action button allows you to change the Pulled column value. Select a row in the grid and then click this action button in order to change the Pulled column value to Yes or No.
MMR Tab
This tabbed section will display a grid that contains all of the MMR’s for this order. You can add additional MMR’s, Import MMR’s, Delete MMR’s or Setup Blends/Sieves. Click here for more information on Blends.
Charges Tab
This tabbed section will list all charges added via the Testing Charges button and any manually added charges. To add a manual charge fill out the name, cost and click the “Add Charge” button.
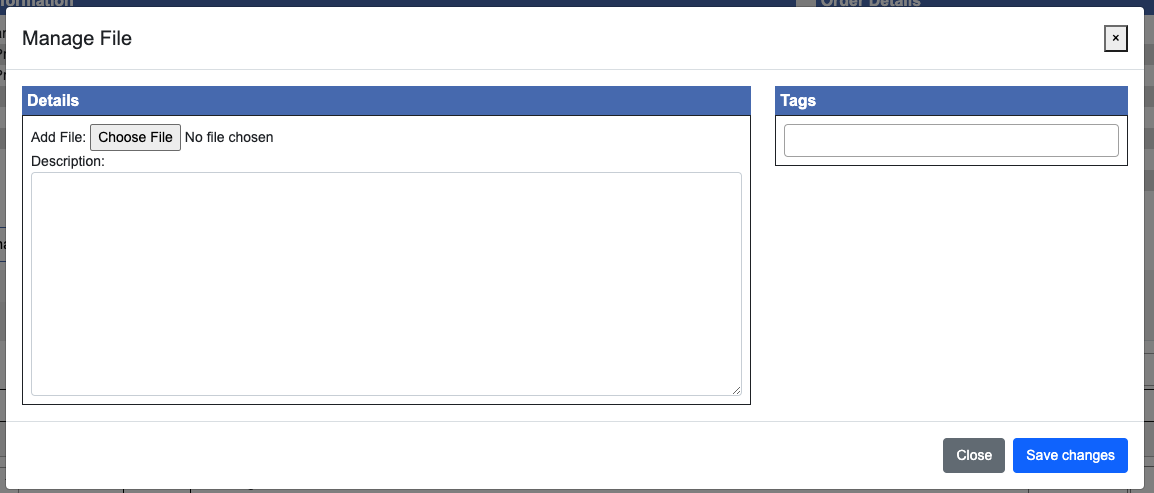
Files Tab
This tabbed section will allow you to add files to the order. Click the “Add New” File Tab Action button to start this process. When adding a file to an order you can add a description and tags. See example image below – click to enlarge.
Notes Tab
This tabbed section will allow you to add notes to an order. Click the “Add New” Notes Tab Action button to start this process. When adding a note to an order you can also add tags.
Count Log Tab
This tabbed section will allow you to view any changes made to the order amount/count. Changes are made by adding/removing BPR’s or manually changing the order count via the Edit Details button.
BPR Log Tab
This tab will allow you to view production records that have been added, deleted or completed for this order.
POs Assigned Tab
Information coming soon.
Scheduling Tab
This tab will allow you to Schedule Lines for production that can then be viewed on the Calendar. This functionality will first require that you have your Line Types and Lines setup. For more information on Scheduling a Line click here.
A Master Manufacturing Record (MMR) is a blueprint to create the product for an order. MMRs can be individualized per customer and per amount. To add an MMR to an order click the “Add New MMR” action button in the MMR tabbed section. If an MMR has already been created in another order you can import the MMR by clicking the Import MMR button. Not all MMRs can be imported. Only MMRs with the same ingredients as the current order can be imported.
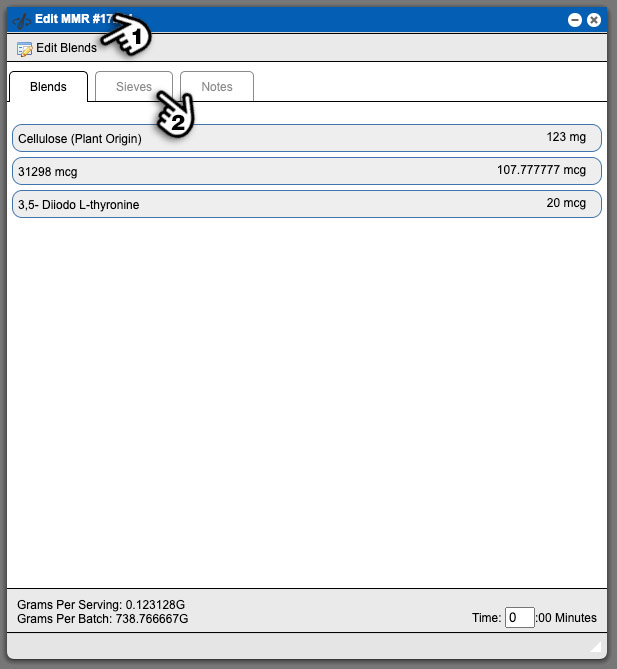
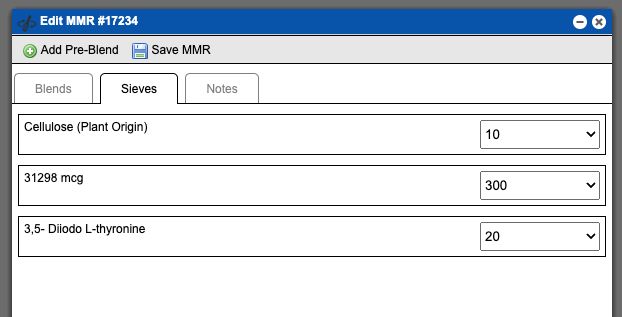
To set up blends and pre-blends click the “Setup Blends/Sieves” action button in the MMR tabbed section, this will open a new window (see example below). Click “Edit Blends” (1) at the top of the window to modify existing items or save your changes. Once you are editing a blend you can re-order the ingredients or create a pre-blend. To create a pre-blend you will need to first select your ingredients and then click the “Add Pre-Blend” action button located at the top of the window. See example image at very bottom of this page. Doing so will allow you to set up ingredients that need to be blended before they are added to the main blend. To set the sieves to be used for each ingredient click the Sieves tab (2) and set your specifications. See example image below.
Once your blends and or pre-blends have been set up and Sieves have been selected click the “Save MMR” action button located at the top of the window. See example image below. The action will create another version of the MMR with your changes. Any production records created from a previous versions of an MMR will need to be updated. This process will be available when viewing a production record.
For more information on creating and editing Quotes please view this Help Page documentation.
For more information on Batch Production Records (BPR’s) view this Help Page documentation.
See our Workflow Diagram for Quote to Fulfillment here
