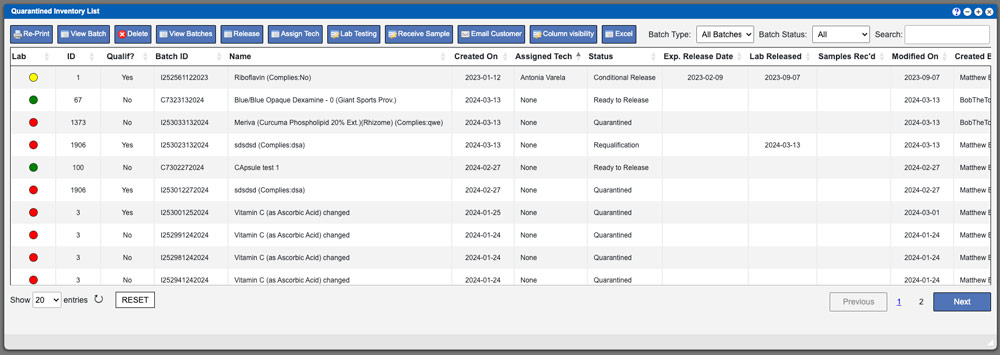
The Quarantine List window displays all batches that have been received into the system and are pending required testing. This area allows you to initiate and manage laboratory testing for each batch to support safe release into your workflow. From this window, you can review batch details, assign technicians, print documentation, and oversee all related lab testing activities in one centralized location.
The grid entries can be sorted by clicking the column titles, using the search function or filtering by additional options. For more information on Grid Sorting click here. Not all components will require Lab Testing before being released. Examples of components that require Lab Testing are Ingredients. Components that require Lab Testing are set up in your initial onboarding process.
Virtual Ops System Location/Navigation:
Inventory > Quarantine List
Grid Action Buttons:
Print Batch – This action will download the Batch Sticker(s) for re-printing.
Print Samples – This action will download the Sample Stickers for re-printing.
View Batch – This action will display the details of the selected Batch. For more info click here.
Delete – This action will delete the selected batch from quarantine.
View Batches – This action will display all batches for the component of the selected batch. For example, If a batch is for the component Riboflavin (vitamin B2) clicking the “View Batches” button will display all active batches for the component Riboflavin (vitamin B2). For more information please click here.
Release – If a component/ingredient is in the “Ready to Release” status – this action will allow you to release the batch into active inventory. Components that do not require Lab Testing will automatically be put into “Ready to Release” status.
Assign Tech – This action will assign a Technician to this batch. Select a user (technician) via the dropdown box at the top. More information below.
Lab Testing – This action will open the Lab Testing window and allow you to add testing. More information on Lab Testing can be found below.
Receive Sample – This action will allow you to mark a batch as received samples.
Email Customer – This action will allow you to email the selected batch details directly from the system.
Column visibility – By selecting this option you can change the visible columns per the grid you are on. These selections are saved per user/browser per grid.
Excel – Selecting this action will export the currently selected grid data to excel.
Once you have selected a batch from the grid you can click the “Assign Tech” grid action button located at the top of the grid. At that point you can assign a tech by clicking the top most dropdown input and selecting a user. The selected user will be automatically added and the window saved after clicking. See example image below.

The Lab Testing action will allow you to add required testing for received inventory components. Lab Testing can include testing types for Hard Metals, Color, Loss on Drying, pH and more. Additional custom Test Types can be added by Administrators. For more information on adding custom Test Types click here.
Select a batch row from the grid and click the Lab Testing action button located at the top of the window/grid to get started.
The Lab Testing window will contain Batch Details, which are auto-populated, Details, on the top right, and tabbed sections in the bottom portion of the window. You can input or select any other needed Details in the top right area and then click the black “Save Details” button (1). Please be aware that upon saving the initial details in this window, it will then put this batch into Lab Testing status. See example image below.
Access the tabbed sections (2) by clicking their titles – by default the Tests tab is open.
The Chemicals tab will allow you to add chemical batches to the testing procedures. This is helpful if you are doing internal lab testing. For more information on Chemical Batches click here.
The Batch Files tab will allow you to add files to the batch. Files may have been added already during the quarantine process. These files could include COA’s, manufacturing packing slips or any other documentation that needs to be associated with the batch.
The Component Details tab will display any documentation files that are saved for the component in the batch.
The Tests Tab is where you will select and add Tests. Click the input (3) to select from available tests. Once a test has been selected to be added you will need to fill out the available input boxes; some of inputs are required. Enter your user password and then click the “Add Test” button located at the bottom right corner to complete this process. See example image below – click to enlarge.

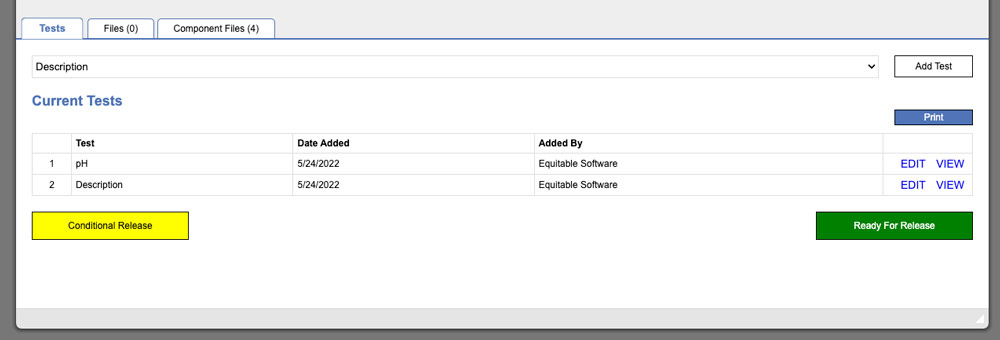
Tests that have been added will show up in the list at the bottom of the Tests tab. You can, Edit, View or Print Tests from this area as needed. When printing lab tests a PDF will be downloaded. The PDF will contain a summary on all the tests you selected to print. Electing for inclusion for a test summary can be done while creating or editing tests. Learn more here. Under the summary will be the following fields.
- Reviewed by – The user and the date who moves the batch into QC Review status.
- QC Reviewed by – The user who moves the batch into QA Release status.
- Approved by – The user who moves the batch into Ready To Release status.
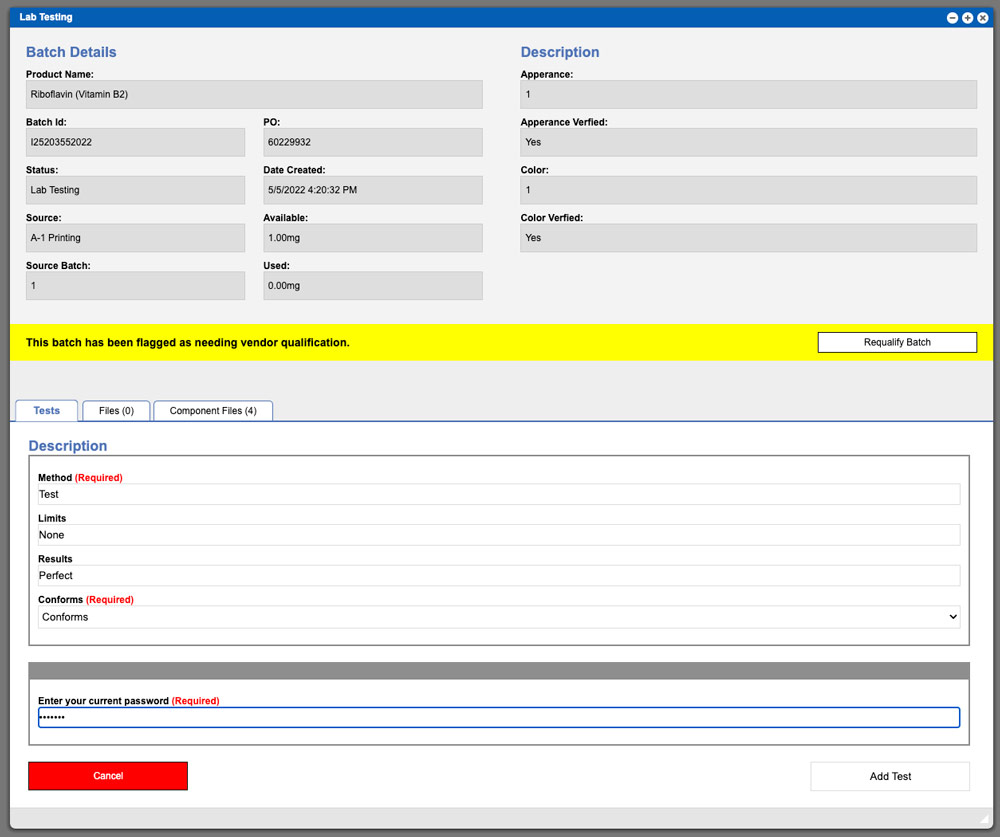
The “Requalify Batch” button will mark this batch as being qualified. For more information on the requalification system click here. See example above.
The “Submit for QC Review” button will mark this batch as needed to be reviewed by a QC personnel with proper permissions. Generally you will add any needed testing before clicking this button.
The “Ready to Release” button will allow this batch to be released into available inventory. To complete the release you will need to click the Release action button on the Quarantine List Grid. See example image below.
The “Conditional Release” button will allow this batch to be used in active inventory just like any other batch. You cannot finalize a BPR with a batch that has a conditional release status until it has been released into available inventory. See example image below.
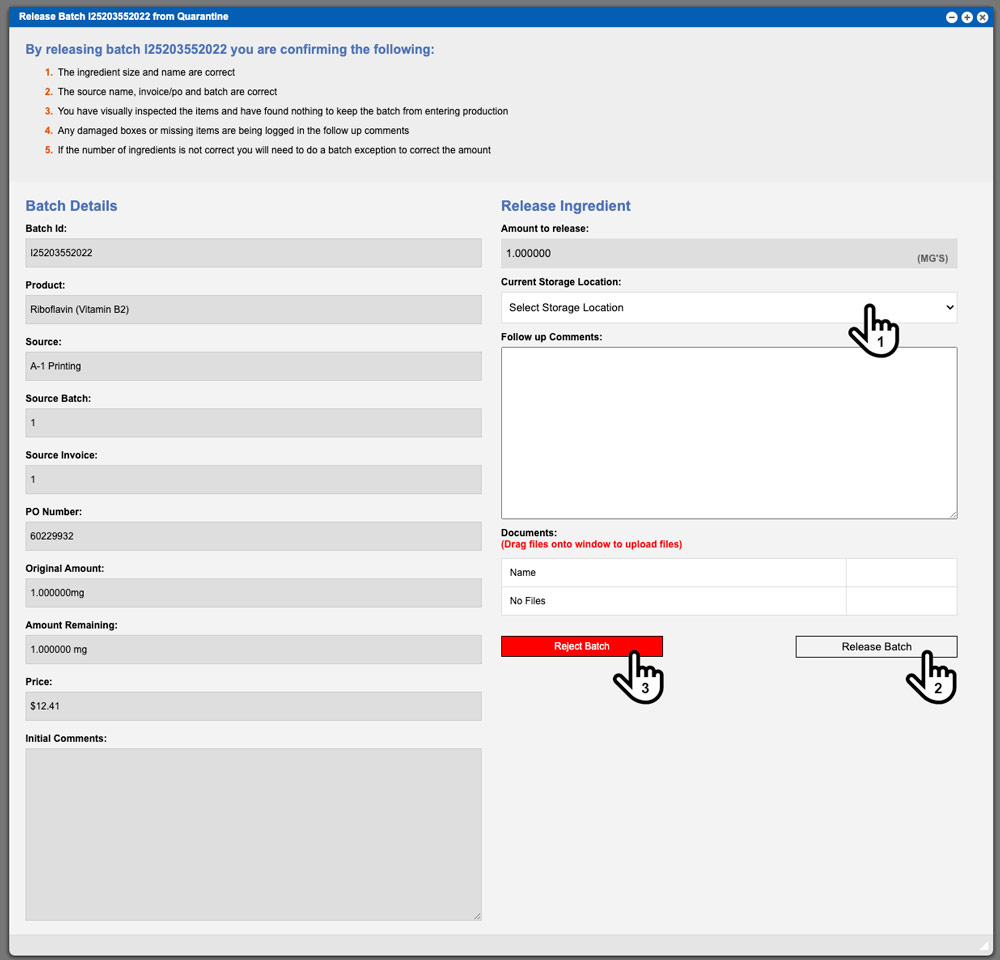
Releasing a Batch into available Inventory
From the Quarantine grid view you can select a component and click the Release action button at top of the window above the grid. Keep in mind that the component must be in Ready to Release status for this action to be started/completed. Start by selecting the initial location the batch will be released into by using the Current Storage Location dropdown (1). Enter in any Follow up Comments, add any needed Documents and then click the Release Batch button (2) at the bottom of the window. You can also Reject Batch by clicking the “Reject Batch” button (3). See example image below. To view rejected batches, using the menu, go to Inventory Batches -> View Batches -> and select your component. Filter the displayed grid by “rejected” to see the rejected batches.
Auto PO Received Feature
If the PO Auto Receive feature is turned on in your Virtual Ops, the following steps will be taken when you release inventory.
- If all the items on the PO assigned to the batch have been received the PO status will be automatically switched to “Received”.
- If some of the items on the PO assigned to the batch have been received the PO status will be automatically switched to “Partially Received”.
Helpful links
Receiving to Releasing Inventory Workflow chart
