The Lines module is the second step in configuring the Scheduling system within Virtual Office. A Line represents an individual production line within your facility. Each Line must be assigned to a parent Line Type, and configured with its operational details such as setup times, production rates, assigned equipment, shift schedules, and cleaning requirements. Once these items are completed you will have the ability to schedule lines for production that can then be viewed on the Calendar.
Virtual Office System Location/Navigation:
Scheduling > Lines
Quick Links
Scheduling a Line
Grid Action Buttons
Add Line – Create a new Line.
Edit Line – Edit an existing Line entry.
Activate/Deactive – Set a Line Status from the grid view.
Column Visibility – Customize which columns are visible in the grid (preferences saved per user/browser).
Excel – Export current grid data to Excel.
Adding and Editing Lines
When creating or editing a Line, the following fields must be defined:
- Line Name – Provide a unique identifier (e.g., station number, facility name, or other designation).
- Line Type – Select the parent Line Type from the dropdown list.
- Units per Minute (UPM) – Define the default production throughput.
• Optionally, enable “Use UPM from Last Run” to allow automatic updating based on the previous job. - Setup Time (Minutes) – Input time required for initial setup.
- Line Setup Time (Minutes) – Input additional time required for preparing the line before production.
- Notes – Add any relevant operational notes.
- Save Line – Save the entry before proceeding to additional configurations.
- Complete Additional Details Tabs – Shift Schedules, Equipment & Line Cleaning.
Adding and Editing Lines – Additional Details
After saving the Line, select it from the grid and continue setup using the Edit Line grid action button.
Shift Schedules
- Every Line requires at least one shift schedule.
- Use Add Shifts to define work periods.
- Shifts can be labeled by time ranges, days, or facility-specific identifiers.
Equipment Assignment
- Assign specific equipment to the Line for accurate scheduling and utilization tracking.
Line Cleaning
- Configure cleaning schedules to ensure compliance with operational and regulatory standards.
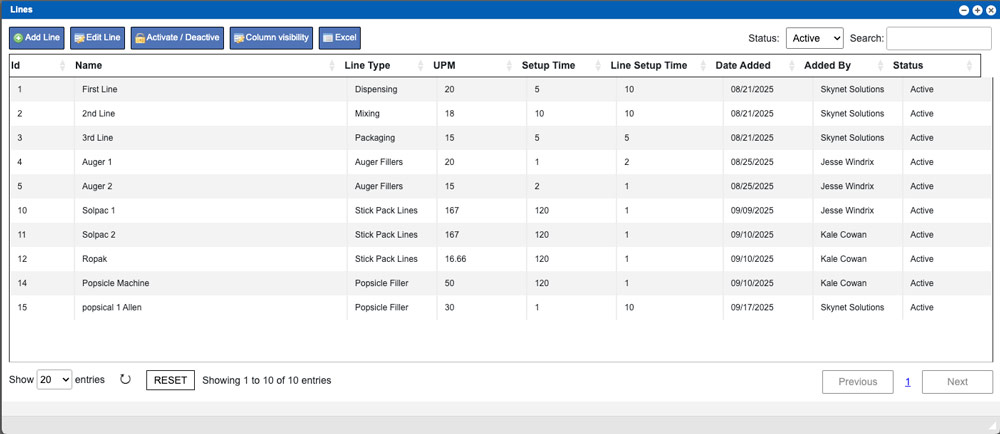
Step by Step Process: This page will display a grid that will contain all of the Lines created in your system. If you are setting up this system for the first time you can start by creating lines for your Dispensing, Mixing and Packaging Line Types. On this page we will be continuing with our Powders Job Type example we started with on Line Type Help Page. Our example warehouse has two Auger stations so we will be creating separate Lines for these; Auger 1 and Auger 2. These Line entries can be seen in the grid image at the very top of this page. Each of these Lines can be designated by unique names, locations, equipment, etc – However, each of these Lines will be assigned to the same Line Type of “Auger Mixers”. Click the “Add Line” button at the top of the grid to begin this process. Add/Edit Line window example is below – click to enlarge.
Line Name: When setting the line name you could consider adding a row number, facility name, or other designation that would verify its identity over other similar lines when viewing system information from a grid or within documentation.
Line Type: Click and select the Line Type from the dropdown options that will need to be assigned to this Line.
UPM Settings: Setting your UPM (Units Per Minute) as a general limitation associated with the equipment is a good start. Setting the “Use UPM from last run” to Yes – will allow the system to automatically update the UPM value per the previous job of this type that was completed. Setting this input to No – will leave the UPM input value as the all-time value.
Setup Time Minutes: Estimate and input any required time allotments needed for Setup time. This timing metric will contribute to the total job time and will be accounted for on the Calendar timeline when scheduling BPR’s for production on this Line.
Line Setup Minutes: Estimate and input any required time allotments needed for Line Setup time. This timing metric will contribute to the total job time and will be accounted for on the Calendar timeline when scheduling BPR’s for production on this Line.
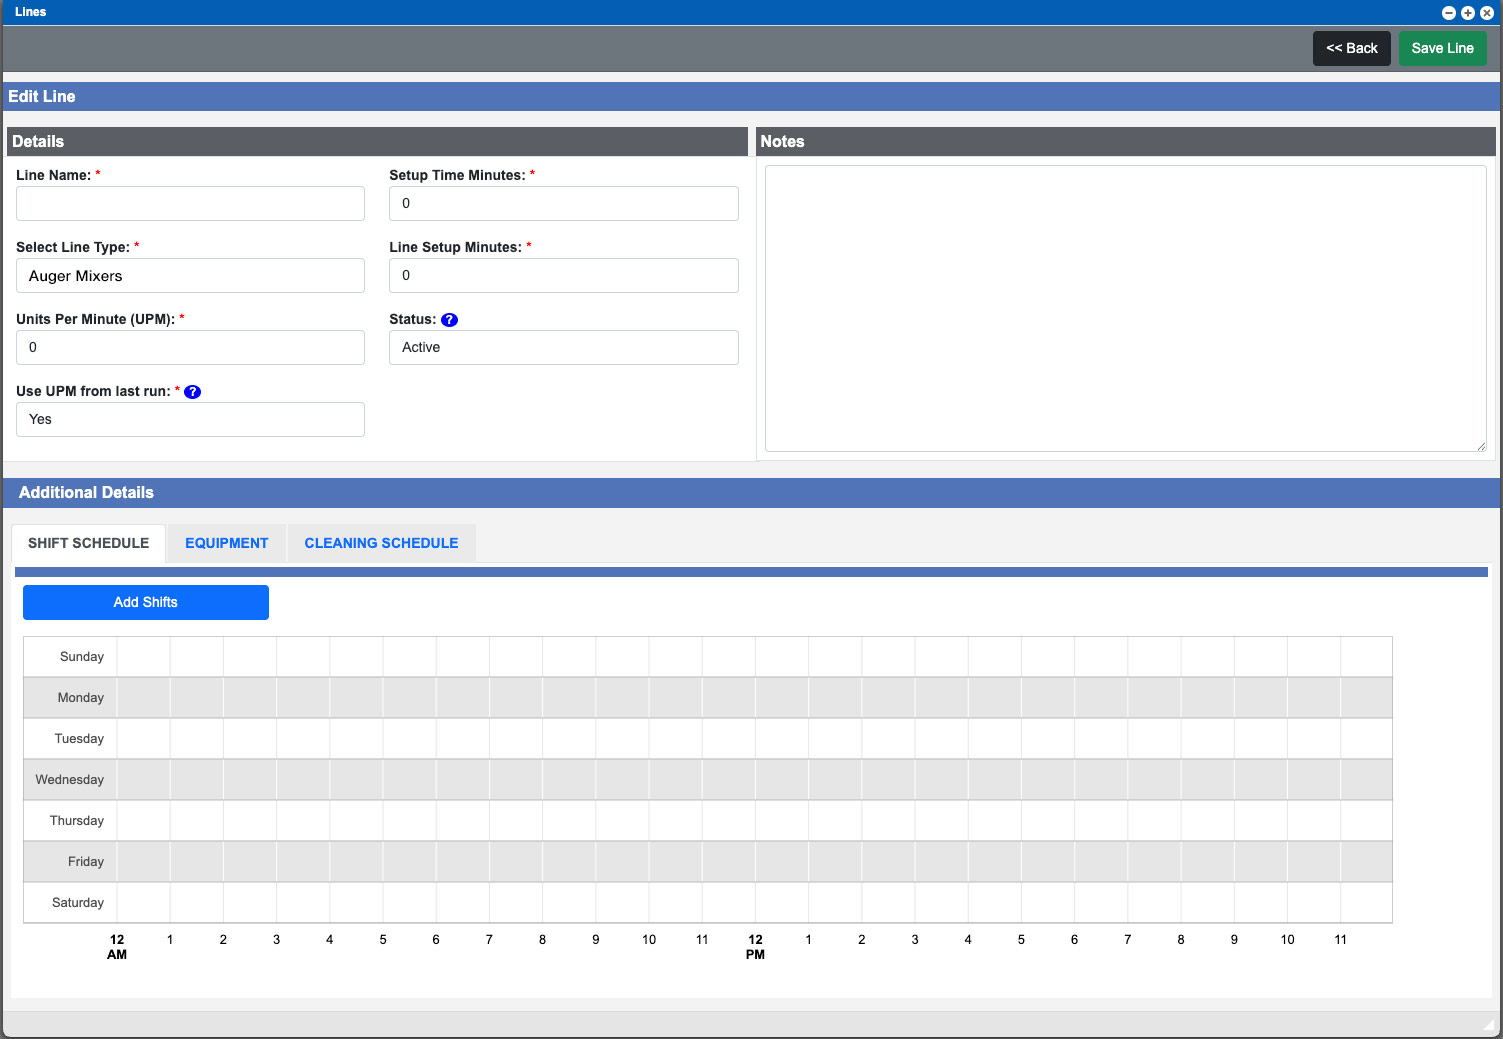
At this point you should add any notes, if needed, and then click the “Save Line” button located at the top of the window before moving into the Additional Details tabs. This will add the Line to the grid. Click to select the Line from the grid and then click the “Edit Line” action button at the top of the grid to continue with the setup process. Scroll to the bottom of the window to the Additional Details section.
Adding Shift Schedules:
Every line is required to have Shift Schedules setup. These relate to the staff running the equipment. Click the blue “Add Shifts” button start this process.
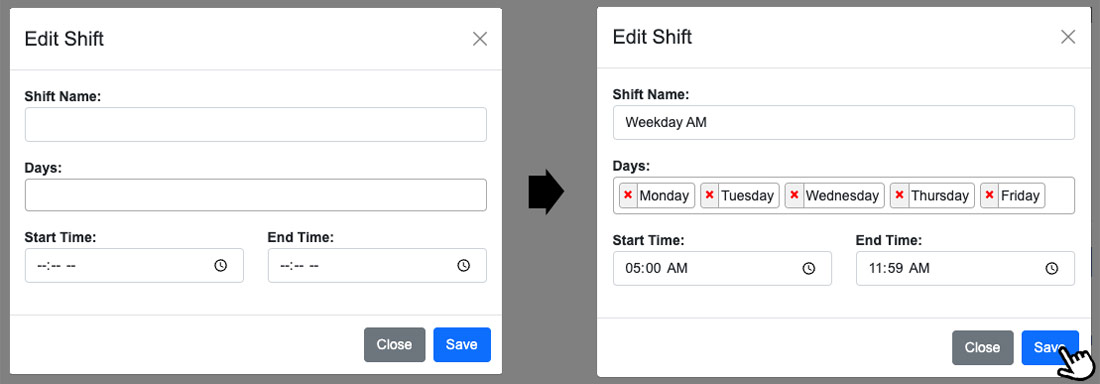
Start by giving your Shift a name. Shifts can be named per the time period, days or other designations as you see fit. Click the Days input box to then select the Days needed for the Shift. Repeat this process for as many Days required for the Shift. You can remove days by clicking the red “X” next to the added day in the input box. Set the Shift Start Time and End Times. Click the blue “Save” button at the bottom of the window. See example image above, click to enlarge.
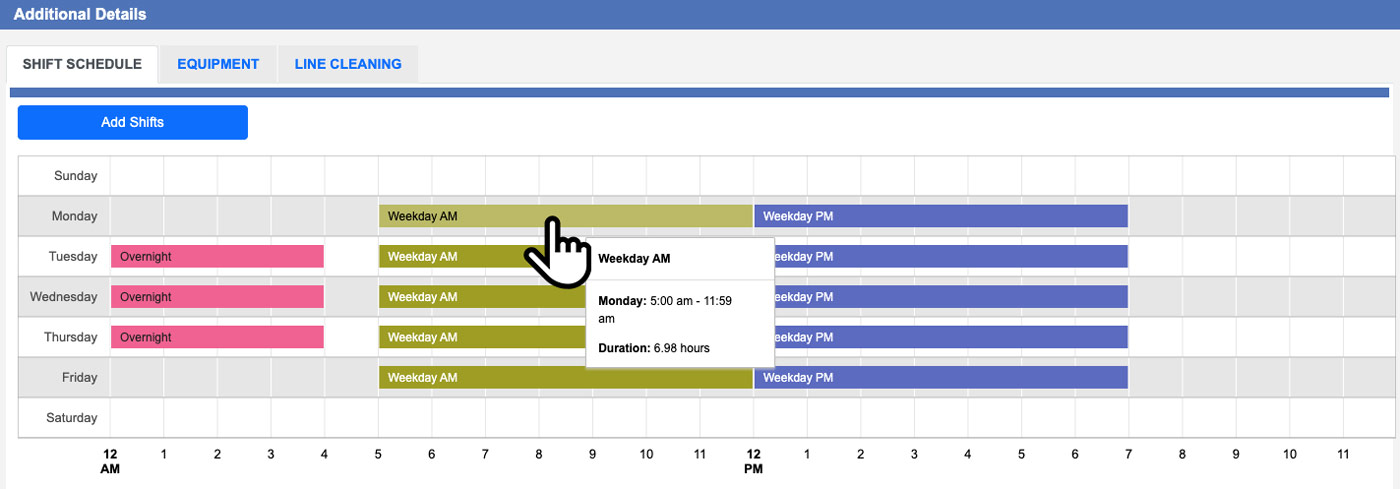
Created Shifts will appear on the timeline and can then be further edited as needed. You can quickly see Shift details by hovering your mouse cursor over a particular Shift on the timeline. See example image below, click to enlarge. You can then further edit individual Shifts by double clicking one from the Timeline.
Be sure to click the green “Save Line” button located at the very top of the window after setting up any Shifts and before moving on to the other tabbed sections.
Adding Equipment
You can add/assign Equipment to your Lines by clicking the Equipment tab in the Additional Details section of any Line. For more information on Equipment click here. This set is not required in order to use the Scheduling function but completing this portion will help determine the warehouse that the line resides in and may help tie in additional metrics for timing or future updates to the system. For more information on Warehouses click here.
Use the Warehouse and Equipment input drop-downs to select from the available options and then click the “Add Equipment” button to add an entry to the Equipment list. See example image below, click to enlarge.
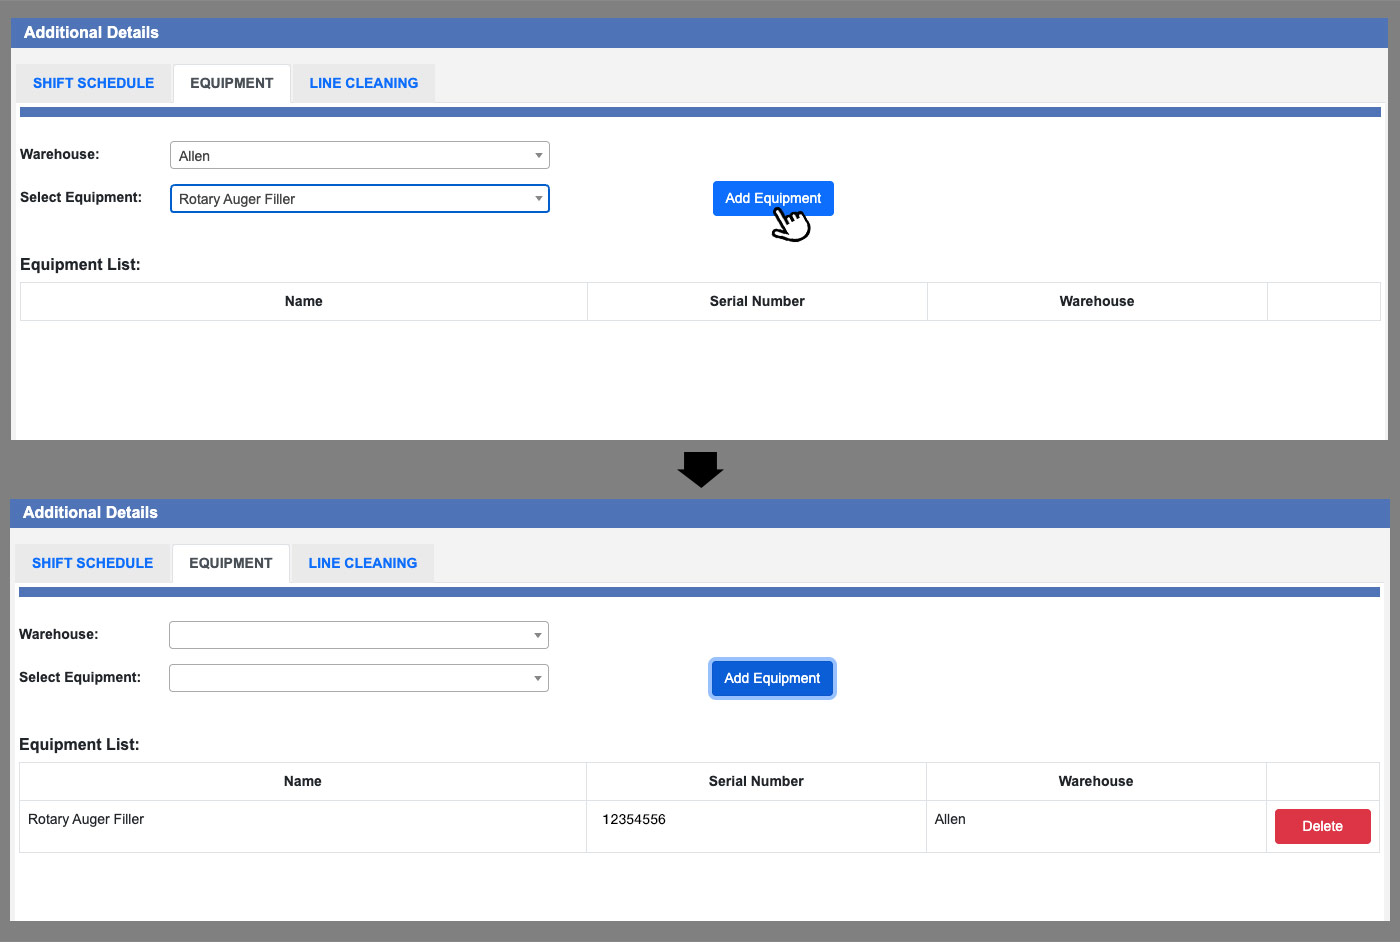
Your Equipment options will populate in the list at the bottom portion of the tab area. Continue adding equipment as needed for this line.
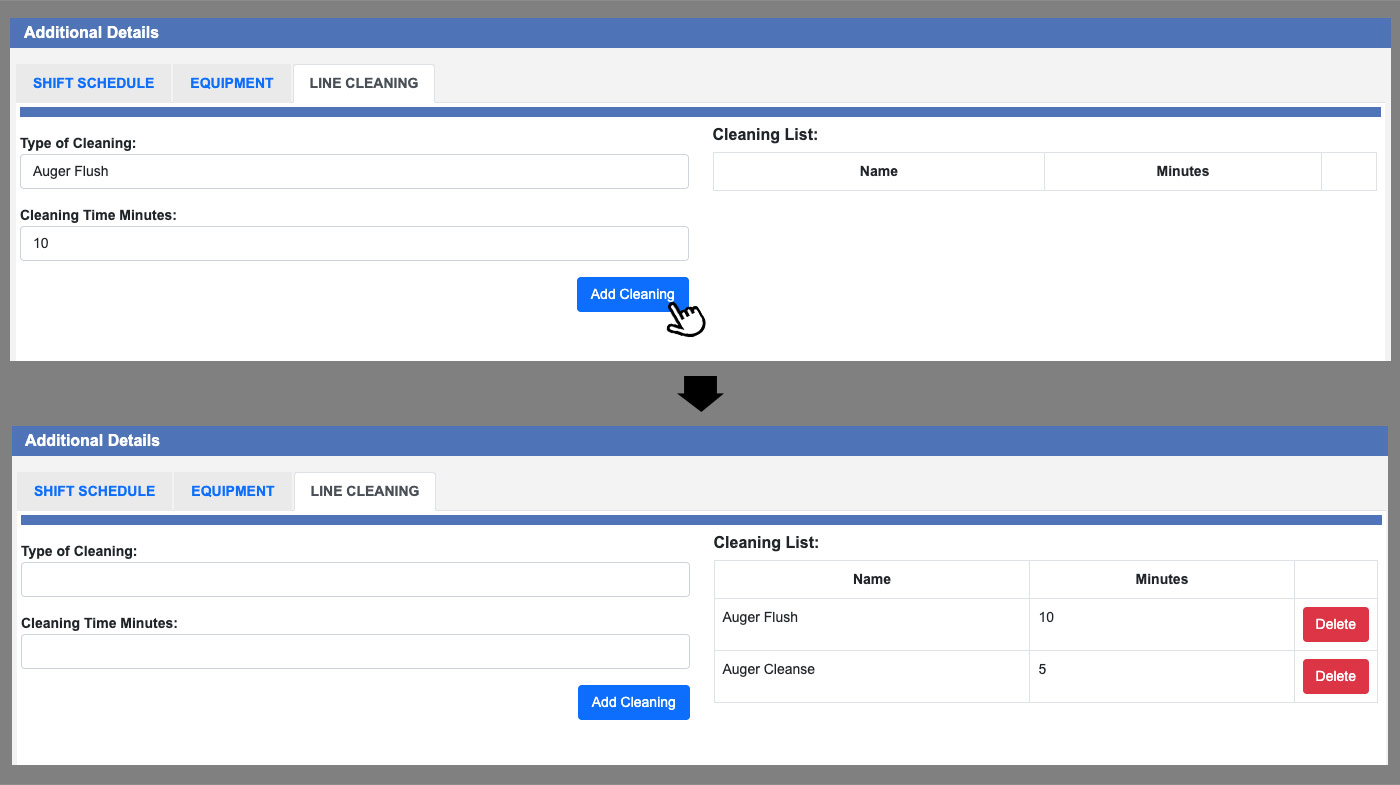
Adding Line Cleaning
Adding Line Cleaning will designate a type of cleaning and timing needed in order to complete the process for cleaning the equipment or line in-between other scheduled productions. Creating these entries will create a list of selectable cleaning procedures which are added to the Cleaning list on the right of the tabbed section. Designated time allotments for cleaning will be accounted for within the timeline and for the total job/production timing. These metrics will help with production efficiency between different scheduled production runs within a shift.
You can add Cleaning to your Lines by clicking the Line Cleaning tab in the Additional Details section of any Line. Create a name for the Type of Cleaning and amount of time needed to complete this process in the two respective inputs. Click the blue “Add Cleaning” button to add this entry to the Cleaning List. Continue adding cleaning entries as needed for the line. You may want to create cleaning instances for any other scenario or job types for the line at this time so they are available during the scheduling process. See example image below, click to enlarge.
Be sure to click the green “Save Line” button located at the very top of the window after setting up any Line Cleaning and before moving on.
Scheduling a Line
Scheduling a line for production occurs from within an Order window (Production > View Orders). To schedule production for a Line you will first need to have at least one approved BPR with a Lot Number within an Order. Find the order you are needing to schedule, click to select the row, and then click the View Order action button. Once you have an order window open scroll to the tabbed sections near the bottom of the window and click on the “Scheduling” tab (1). Then click the black “Schedule Lines” button (2). See example image below, click to enlarge.

A new window will open and you can begin the process for scheduling the line(s) for production. Be aware that you will need to schedule EACH Line Type needed for a production run (generally this is Dispensing/Mixing/Packaging). Meaning you will need to repeat this scheduling process, individually for each Line. The Types and sequence/ordering was dictated during the “Setup Jobs” portion of the Line Type creation. Scheduled lines will populate the grid as entries in the Current Lines section located at the bottom of the window. See example image below, click to enlarge.
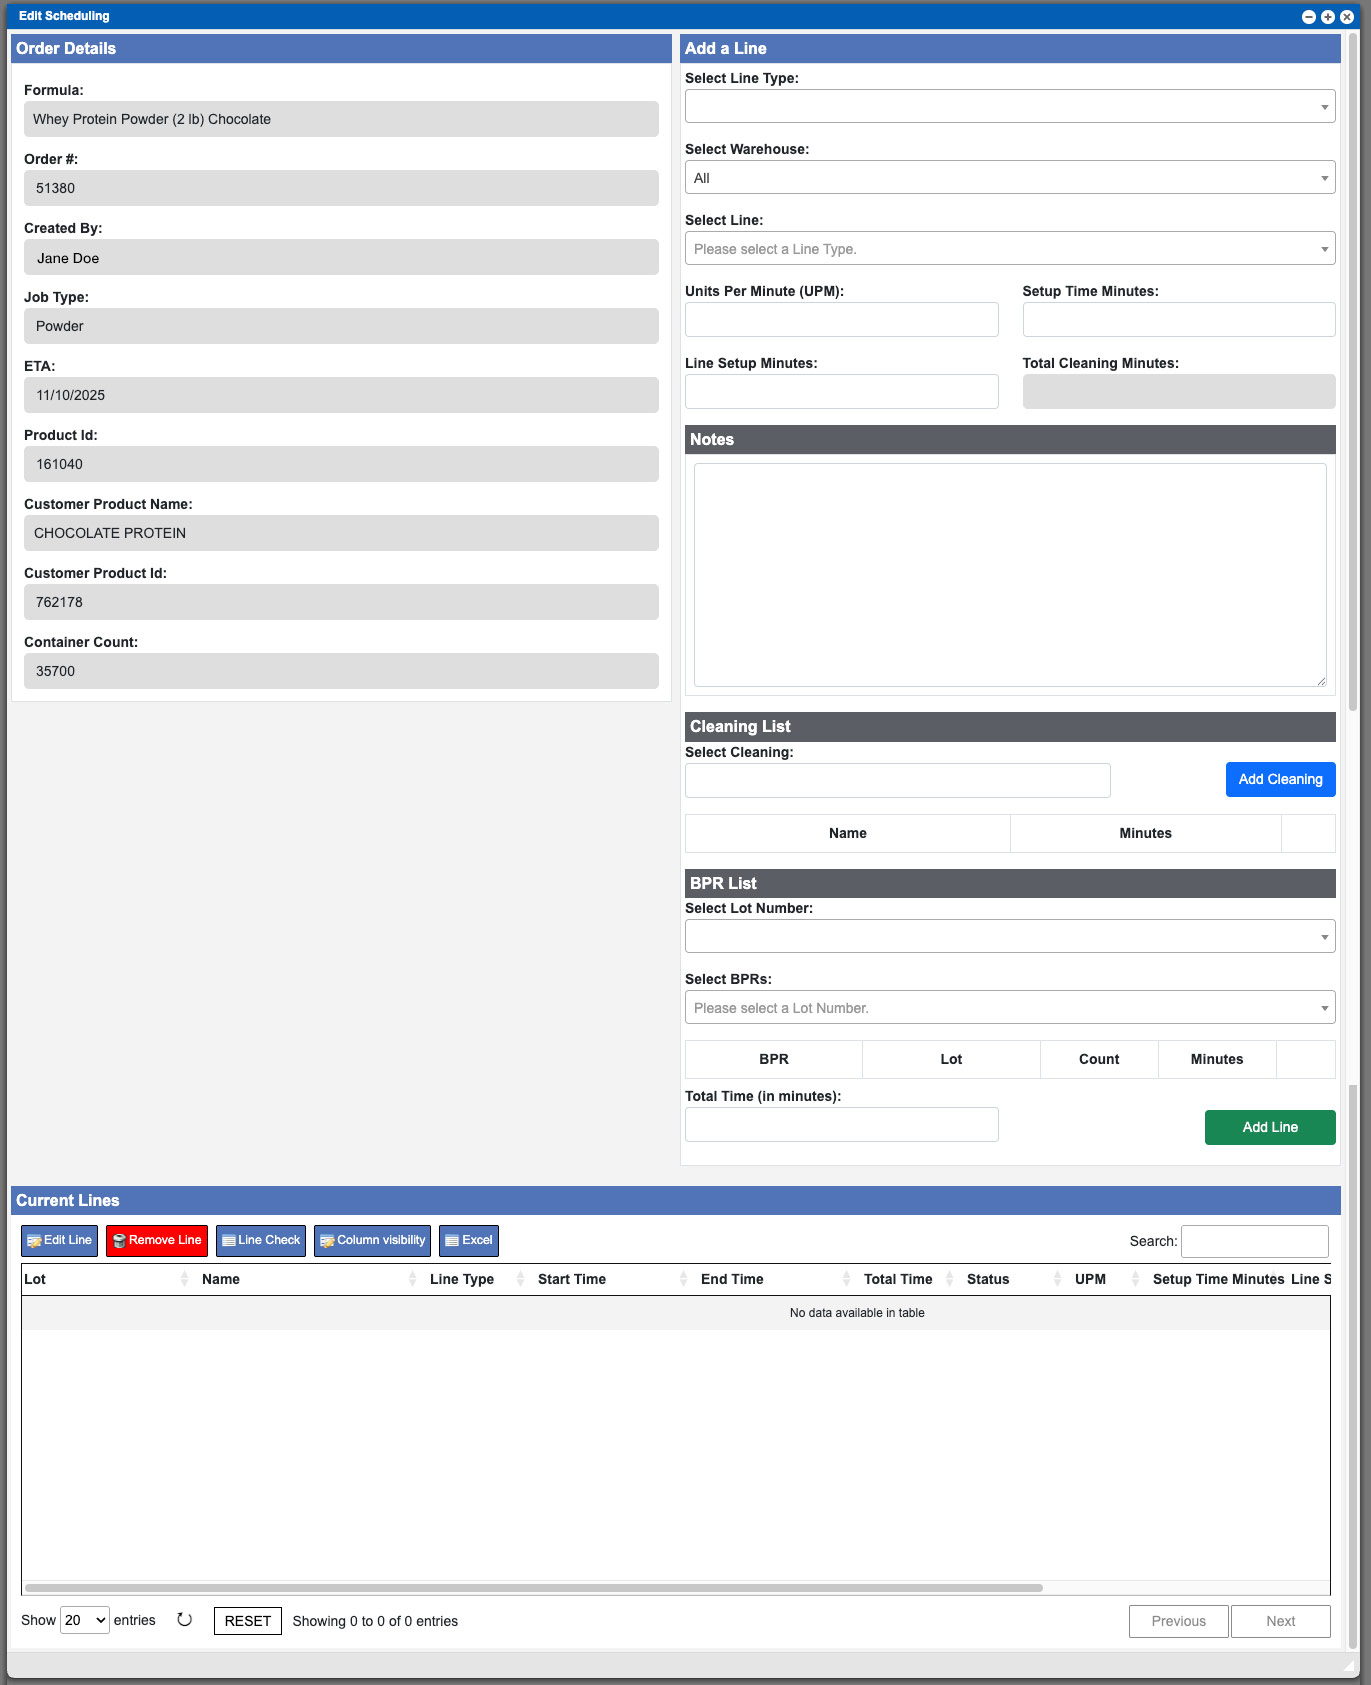
Begin in the top right of the window in the “Add a Line” section by selecting a Line Type, Warehouse and the a Line from their respective dropdown inputs. The timing metrics will populate automatically after selection during this process. Notice when selecting your Line Types, the only available options are the same entries that you created when completing the Setup Jobs portion of the Line Type creation. Keeping in order of production, we will start by adding the Dispensing Line Type first.
Add any notes, if needed and then select your cleanings from the items available in the dropdown input. If there is a cleaning process needed that is not available for the line – you can create a new cleaning by choosing the “Add New Cleaning” option from the dropdown. Click the blue “Add Cleaning” button in order to include these with the production scheduling. Doing so will add the cleaning, as a listed entry, to this scheduled production. Following down the right side we will then come into the BPR list section. Select a Lot number and BPR from their dropdown inputs.
During the scheduling process you have the ability to add multiple Lots by selecting and repeating the process – additional entries will be listed and can then be individually removed via the Delete buttons. PLEASE BE AWARE that the scheduling system, at this time, does NOT monitor your production inputs per your equipment size or limitations. The staff creating the schedule will need to be mindful and aware of this during the scheduling process as to not schedule a BPR that will not entirely “fit” or work with this assigned line.
The Total Time will be calculated and displayed per the timing metrics entered into the system, however you can adjust this timing manually at this time via the input. Once these steps are taken care of click the green “Add Line” button. Doing so will add a grid entry to the Current Lines section at the bottom of the window. See example below.
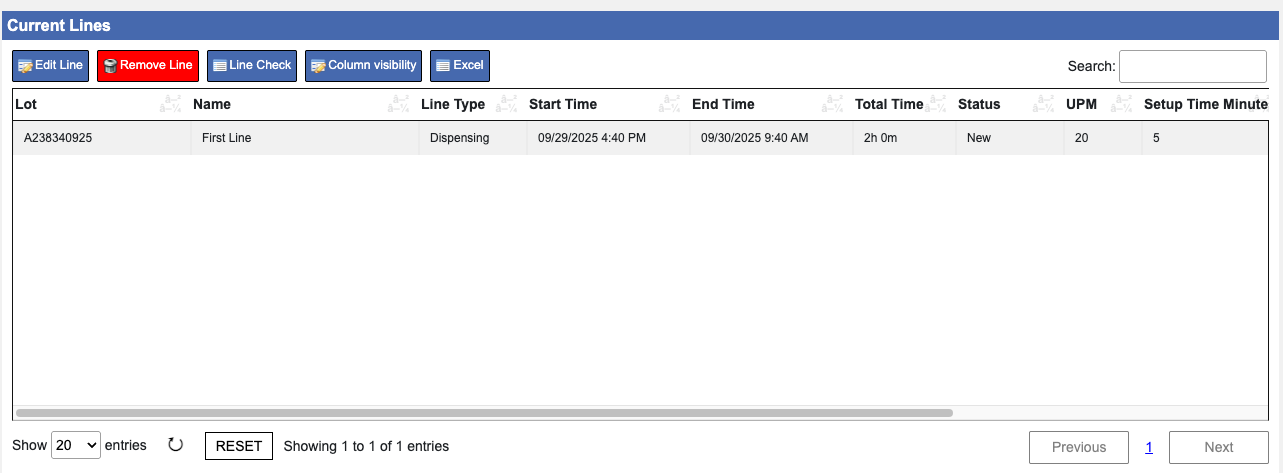
You can use the grid action buttons as needed during this process to edit, delete, Line check, adjust column visibility or export. I would like to highlight the Line Check action button at this time. Clicking this button will bring up window that will display the needed Lines for the Line Type (this was determined during the Setup Jobs action in Line Type setup). See example image below – click to enlarge.
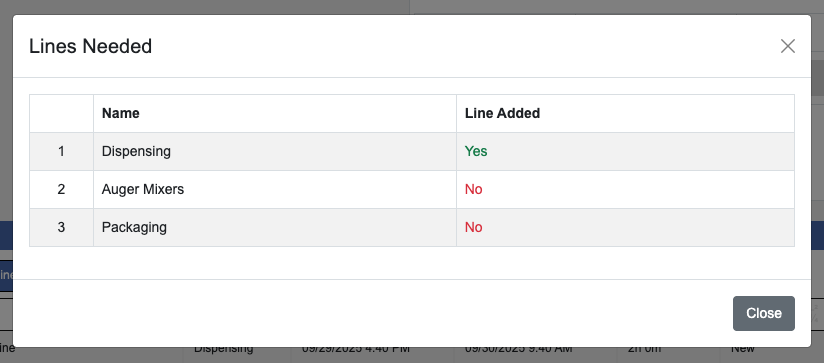
This window provides a quick way to review what other Lines are needed or missing from the scheduling process. We need to repeat the scheduling process for both the Mixing (titled Auger Mixers) and Packaging Lines. Once all of the Lines needed for production have been scheduled they will be present in the Current Lines list and this process is complete. See example image below.
At this point you are now able to view the schedules on the Calendar.
